Wednesday, January 30, 2013

Hello Camel: Automatic File Transfer

Apache Camel is described on its main web page (and in the Camel User Guide) as "a versatile open-source integration framework based on known Enterprise Integration Patterns." The Camel framework is based on the book Enterprise Integration Patterns and provides implementations of the patterns described in that book. I look at a "Hello World" type example of using Camel in this post.

The Camel web page and Users Guide also reference the StackOverflow thread what exactly is Apache Camel? that includes several good descriptions of Apache Camel. David Newcomb has described Camel there:

Apache Camel is messaging technology glue with routing. It joins together messaging start and end points allowing the transference of messages from different sources to different destinations. For example: JMS->JSON, HTTP->JMS or funneling FTP->JMS, HTTP->JMS, JMS=>JSON.

In this post, I look at a simple use of Camel that doesn't require use of a JMS provider or even FTP or HTTP. Keeping the example simple makes it clearer how to use Camel. This example uses Camel to transfer files automatically from a specified directory to a different specified directory. Three cases will be demonstrated.

In the first case, files placed in the "input" directory are automatically copied to an "output" directory without affecting the source files. In the second case, the files placed in the "input" directory are automatically copied to an "output" directory and then the files in the "input" directory are stored in a special ".camel" subdirectory under the "input" directory. The third case removes the files from the "input" directory upon copying to the "output" directory (effectively a "move" operation). All three cases are implemented with almost identical code. The only difference between the three is in the single line specifying how Camel should handle the file transfers.

The next code listing shows the basic code needed to use Camel to automatically copy files placed in an input directory into a different output directory with Camel.

/**
 * Simple executable function to demonstrate Camel file transfer.
 * 
 * @param arguments Command line arguments; excepting duration in milliseconds
 *    as single argument.
 */
public static void main(final String[] arguments)
{
   final long durationMs = extractDurationMsFromCommandLineArgs(arguments);
   final CamelContext camelContext = new DefaultCamelContext();
   try
   {
      camelContext.addRoutes(
         new RouteBuilder()
         {
            @Override
            public void configure() throws Exception
            {
               from("file:C:\\datafiles\\input?noop=true").to("file:C:\\datafiles\\output");
            }
         });
      camelContext.start();
      Thread.sleep(durationMs);
      camelContext.stop();
   }
   catch (Exception camelException)
   {
      LOGGER.log(
        Level.SEVERE,
        "Exception trying to copy files - {0}",
        camelException.toString());
   }
}

The code above demonstrates minimal use of the Camel API and Camel's Java DSL support. A CamelContext is defined with an instantiation of DefaultCamelContext (line 10). Lines 13-21 add the Camel route to this instantiated context and line 22 starts the context with line 24 stopping the context. It's all pretty simple, but the most interesting part to me is the specification of the routing on line 19.

Because the instance implementing the RoutesBuilder interface provided to the Camel Context only requires its abstract configure method to be overridden, it is an easy class to instantiate as an anonymous class inline with the call to CamelContext.addRoutes(RoutesBuilder). This is what I did in the code above and is what is done in many of the Camel examples that are available online.

Line 19 shows highly readable syntax describing "from" and "to" portions of routing. In this case, files placed in the input directory ("from") are to be copied to the output directory ("to"). The "file" protocol is used on both the "from" and "to" portions because the file system is where the "message" is coming from and going to. The "?noop=true" in the "from" call indicates that nothing should be changed about the files in the "input" directory (the processing should have "noop" effect on the source files).

As just mentioned, Line 19 in the code above instructs Camel to copy files already in or placed in the "input" directory to the specified "output" directory without impacting the files in the "input" directory. In some cases, I may want to "move" the files rather than "copying" them. In such cases, ?delete=true can be specified instead of ?noop=true when specifying the "from" endpoint. In other words, line 19 above could be replaced with this to have files removed from the "input" directory when placed in the "output" directory. If no parameter is designated on the input (neither ?noop=true nor ?delete=true), then an action that falls in-between those occurs: the files in the "input" directory are moved into a specially created new subdirectory under the "input" directory called .camel. The three cases are highlighted next.

Files Copied from datafiles\input to datafiles\output Without Impacting Original Files
from("file:C:\\datafiles\\input?noop=true").to("file:C:\\datafiles\\output");
Files Moved from datafiles\input to datafiles\output
from("file:C:\\datafiles\\input?delete=true").to("file:C:\\datafiles\\output");
Files Copied from datafiles\input to datafiles\output and Original Files Moved to .camel Subdirectory
from("file:C:\\datafiles\\input").to("file:C:\\datafiles\\output");

As a side note, the uses of fluent "from" and "to" are examples of Camel's Java DSL. Camel implements this via implementation inheritance (methods like "from" and "to" are defined in the RouteBuilder class) rather than through static imports (an approach often used for Java-based DSLs.)

Although it is common to pass anonymous instances of RouteBuilder to the Camel Context, this is not a requirement. There can be situations in which it is advantageous to have standalone classes that extend RouteBuilder and have instances of those extended classes passed to the Camel Context. I'll use this approach to demonstrate all three cases I previously described. The next code listing shows a class that extends RouteBuilder. In many cases, I would have a no-arguments constructor, but in this case I use the constructor to determine which type of file transfer should be supported by the Camel route.

The next code listing shows a named standalone class that handles all three cases shown above (copying, copying with archiving of input files, and moving). This single extension of RouteBuilder takes an enum in its constructor to determine how to configure the input endpoint.

package dustin.examples.camel;

import org.apache.camel.builder.RouteBuilder;

/**
 * Camel-based Route Builder for transferring files.
 * 
 * @author Dustin
 */
public class FileTransferRouteBuilder extends RouteBuilder
{
   public enum FileTransferType
   {
      COPY_WITHOUT_IMPACTING_ORIGINALS("C"),
      COPY_WITH_ARCHIVED_ORIGINALS("A"),
      MOVE("M");

      private final String letter;

      FileTransferType(final String newLetter)
      {
         this.letter = newLetter;
      }
 
      public String getLetter()
      {
         return this.letter;
      }
  
      public static FileTransferType fromLetter(final String letter)
      {
         FileTransferType match = null;
         for (final FileTransferType type : FileTransferType.values())
         {
            if (type.getLetter().equalsIgnoreCase(letter))
            {
               match = type;
               break;
            }
         }
         return match;
      }
   }

   private final String fromEndPointString;
   private final static String FROM_BASE = "file:C:\\datafiles\\input";
   private final static String FROM_NOOP = FROM_BASE + "?noop=true";
   private final static String FROM_MOVE = FROM_BASE + "?delete=true";

   public FileTransferRouteBuilder(final FileTransferType newFileTransferType)
   {
      if (newFileTransferType != null)
      {
         switch (newFileTransferType)
         {
            case COPY_WITHOUT_IMPACTING_ORIGINALS :
               this.fromEndPointString = FROM_NOOP;
               break;
            case COPY_WITH_ARCHIVED_ORIGINALS :
               this.fromEndPointString = FROM_BASE;
               break;
            case MOVE :
               this.fromEndPointString = FROM_MOVE;
               break;
            default :
               this.fromEndPointString = FROM_NOOP;
         }
      }
      else
      {
         fromEndPointString = FROM_NOOP;
      }
   }

   @Override
   public void configure() throws Exception
   {
      from(this.fromEndPointString).to("file:C:\\datafiles\\output");
   }
}

This blog post has demonstrated use of Camel to easily route files from one directory to another. Camel supports numerous other transport mechanisms and data formats that are not shown here. Camel also supports the ability to transform the messages/data being routed, which is also not shown here. This post focused on what is likely to be as simplest possible example of how to apply Camel in a useful manner, but Camel supports far more than shown in this simple example.

Thursday, January 24, 2013

JavaFX 2 XYCharts and Java 7 Features

One of my favorite features of JavaFX 2 is the standard charts it provides in its javafx.scene.chart package. This package provides several different types of charts out-of-the-box. All but one of these (the PieChart) are "2 axis charts" (specific implementations of the XYChart). In this post, I look at the commonality between these specializations of XYChart. Along the way, I look at several Java 7 features that come in handy.

A UML class diagram for key chart types in the javafx.scene.chart package is shown next. Note that AreaChart, StackedAreaChart, BarChart, StackedBarChart, BubbleChart, LineChart, and ScatterChart all extend XYChart.

As the UML diagram above (generated using JDeveloper) indicates, the PieChart extends Chart directly while all the other chart types extend XYChart. Because all the chart types other than PieChart extend XYChart, they share some common features. For example, they are all 2-axis charts with a horizontal ("x") axis and a vertical ("y") axis. They generally allow data to be specified in the same format (data structure) for all the XY charts. The remainder of this post demonstrates being able to use the same data for most of the XYCharts.

The primary use of a chart is to show data, so the next code listing indicates retrieving of data from the 'hr' sample schema in an Oracle database. Note that JDBC_URL, USERNAME, PASSWORD, and AVG_SALARIES_PER_DEPARTMENT_QUERY are constant Strings used in the JDBC connection and for the query.

getAverageDepartmentsSalaries()
/**
 * Provide average salary per department name.
 * 
 * @return Map of department names to average salary per department.
 */
public Map<String, Double> getAverageDepartmentsSalaries()
{
   final Map<String, Double> averageSalaryPerDepartment = new HashMap<>();
   try (final Connection connection = DriverManager.getConnection(JDBC_URL, USERNAME, PASSWORD);
        final Statement statement = connection.createStatement();
        final ResultSet rs = statement.executeQuery(AVG_SALARIES_PER_DEPARTMENT_QUERY))
   {
      while (rs.next())
      {
         final String departmentName = rs.getString(COLUMN_DEPARTMENT_NAME);
         final Double salaryAverage = rs.getDouble(ALIAS_AVERAGE_SALARY);
         averageSalaryPerDepartment.put(departmentName, salaryAverage);
      }
   }
   catch (SQLException sqlEx)
   {
      LOGGER.log(
         Level.SEVERE,
         "Unable to get average salaries per department - {0}", sqlEx.toString());
   }
   return averageSalaryPerDepartment;
}

The Java code snippet above uses JDBC to retrieve data for populating a Map of department name Strings to the average salary of the employees in each department. There are a couple of handy Java 7 features used in this code. A small feature is the inferred generic parameterized typing of the diamond operator used with the declaration of the local variable averageSalaryPerDepartment (line 8). This is a small granule of syntax sugar, but it does make the code more concise.

A more significant Java 7 feature is use of try-with-resources statement for the handling of the Connection, Statement, and ResultSet resources (lines 9-11). This is a much nicer way to handle the opening and closing of these resources, even in the face of exceptions, than was previously necessary when using JDBC. The Java Tutorials page on The try-with-resources Statement advertises that this statement "ensures that each resource is closed at the end of the statement" and that each resource will "be closed regardless of whether the try statement completes normally or abruptly." The page also notes that when there are multiple resources specified in the same statement as is done in the above code, "the close methods of resources are called in the opposite order of their creation."

The data retrieved from the database can be placed into the appropriate data structure to support use by most of the XYCharts. This is shown in the next method.

ChartMaker.createXyChartDataForAverageDepartmentSalary(Map)
/**
 * Create XYChart Data representing average salary per department name.
 * 
 * @param newAverageSalariesPerDepartment Map of department name (keys) to
 *    average salary for each department (values).
 * @return XYChart Data representing average salary per department.
 */
public static ObservableList<XYChart.Series<String, Double>> createXyChartDataForAverageDepartmentSalary(
   final Map<String, Double> newAverageSalariesPerDepartment)
{
   final Series<String, Double> series = new Series<>();
   series.setName("Departments");
   for (final Map.Entry<String, Double> entry : newAverageSalariesPerDepartment.entrySet())
   {
      series.getData().add(new XYChart.Data<>(entry.getKey(), entry.getValue()));
   }
   final ObservableList<XYChart.Series<String, Double>> chartData =
      FXCollections.observableArrayList();

   chartData.add(series);
   return chartData;
}

The method just shown places the retrieved data in a data structure that can be used by nearly all of the XYChart-based charts. With the retrieved data now packaged in a JavaFX observable collection, the charts can be easily generated. The next code snippet shows methods for generating several XYChart-based charts (Area, Bar, Bubble, Line, and Scatter). Note how similar they all are and how the use the same data provided by the same method. The StackedBar and StackedArea charts can also use similar data, but are not shown here because they are not interesting for the single series of data being used in this example.

Methods for Generating XYCharts Except BubbleChart and Stacked Charts
private XYChart<String, Double> generateAreaChart(
   final Axis<String> xAxis, final Axis<Double> yAxis)
{
   final AreaChart<String, Double> areaChart =
      new AreaChart<>(
         xAxis, yAxis,
         ChartMaker.createXyChartDataForAverageDepartmentSalary(
            this.databaseAccess.getAverageDepartmentsSalaries()));
   return areaChart;
}

private XYChart<String, Double> generateBarChart(
   final Axis<String> xAxis, final Axis<Double> yAxis)
{
   final BarChart<String, Double> barChart =
      new BarChart<>(
         xAxis, yAxis,
         ChartMaker.createXyChartDataForAverageDepartmentSalary(
            this.databaseAccess.getAverageDepartmentsSalaries()));
   return barChart;
}

private XYChart<Number, Number> generateBubbleChart(
   final Axis<String> xAxis, final Axis<Double> yAxis)
{
   final Axis<Number> deptIdXAxis = new NumberAxis();
   deptIdXAxis.setLabel("Department ID");
   final BubbleChart<Number, Number> bubbleChart =
      new BubbleChart(
         deptIdXAxis, yAxis,
         ChartMaker.createXyChartDataForAverageDepartmentSalaryById(
            this.databaseAccess.getAverageDepartmentsSalariesById()));
   return bubbleChart;
}

private XYChart<String, Double> generateLineChart(
        final Axis<String> xAxis, final Axis<Double> yAxis)
{
   final LineChart<String, Double> lineChart =
      new LineChart<>(
         xAxis, yAxis,
         ChartMaker.createXyChartDataForAverageDepartmentSalary(
            this.databaseAccess.getAverageDepartmentsSalaries()));
   return lineChart;
}

private XYChart<String, Double> generateScatterChart(
   final Axis<String> xAxis, final Axis<Double> yAxis)
{
   final ScatterChart<String, Double> scatterChart =
      new ScatterChart<>(
         xAxis, yAxis,
         ChartMaker.createXyChartDataForAverageDepartmentSalary(
            this.databaseAccess.getAverageDepartmentsSalaries()));
   return scatterChart;
}

These methods are so similar that I could have actually used method handles (or more traditional reflection APIs) to reflectively call the appropriate chart constructor rather than use separate methods. However, I am using these for my RMOUG Training Days 2013 presentation in February and so wanted to leave the chart-specific constructors in place to make them clearer to audience members.

One exception to the general handling of XYChart types is the handling of BubbleChart. This chart expects a numeric type for its x-axis and so the String-based (department name) x-axis data provided above will not work. A different method (not shown here) provides a query that returns average salaries by department ID (Long) rather than by department name. The slightly different generateBubbleChart method is shown next.

generateBubbleChart(Axis, Axis)
   private XYChart<Number, Number> generateBubbleChart(
      final Axis<String> xAxis, final Axis<Double> yAxis)
   {
      final Axis<Number> deptIdXAxis = new NumberAxis();
      deptIdXAxis.setLabel("Department ID");
      final BubbleChart<Number, Number> bubbleChart =
         new BubbleChart(
            deptIdXAxis, yAxis,
            ChartMaker.createXyChartDataForAverageDepartmentSalaryById(
               this.databaseAccess.getAverageDepartmentsSalariesById()));
      return bubbleChart;
   }

Code could be written to call each of these different chart generation methods directly, but this provides a good chance to use Java 7's method handles. The next code snippet shows this being done. Not only does this code demonstrate Method Handles, but it also uses Java 7's multi-catch exception handling mechanism (line 77).

/**
 * Generate JavaFX XYChart-based chart.
 * 
 * @param chartChoice Choice of chart to be generated.
 * @return JavaFX XYChart-based chart; may be null.
 * @throws IllegalArgumentException Thrown if the provided parameter is null.
 */
private XYChart<String, Double> generateChart(final ChartTypes chartChoice)
{
   XYChart<String, Double> chart = null;
   final Axis<String> xAxis = new CategoryAxis();
   xAxis.setLabel("Department Name");
   final Axis<? extends Number> yAxis = new NumberAxis();
   yAxis.setLabel("Average Salary");
   if (chartChoice == null)
   {
      throw new IllegalArgumentException(
         "Provided chart type was null; chart type must be specified.");
   }
   else if (!chartChoice.isXyChart())
   {
      LOGGER.log(
         Level.INFO,
         "Chart Choice {0} {1} an XYChart.",
         new Object[]{chartChoice.name(), chartChoice.isXyChart() ? "IS" : "is NOT"});
   }

   final MethodHandle methodHandle = buildAppropriateMethodHandle(chartChoice);
   try
   {
      chart =
        methodHandle != null
      ? (XYChart<String, Double>) methodHandle.invokeExact(this, xAxis, yAxis)
      : null;
      chart.setTitle("Average Department Salaries");
   }
   catch (WrongMethodTypeException wmtEx)
   {
      LOGGER.log(
         Level.SEVERE,
         "Unable to invoke method because it is wrong type - {0}",
         wmtEx.toString());
   }
   catch (Throwable throwable)
   {
      LOGGER.log(
         Level.SEVERE,
         "Underlying method threw a Throwable - {0}",
         throwable.toString());
   }

   return chart;
}

/**
 * Build a MethodHandle for calling the appropriate chart generation method
 * based on the provided ChartTypes choice of chart.
 * 
 * @param chartChoice ChartTypes instance indicating which type of chart
 *    is to be generated so that an appropriately named method can be invoked
 *    for generation of that chart.
 * @return MethodHandle for invoking chart generation.
 */
private MethodHandle buildAppropriateMethodHandle(final ChartTypes chartChoice)
{
   MethodHandle methodHandle = null;
   final MethodType methodDescription =
      MethodType.methodType(XYChart.class, Axis.class, Axis.class);
   final String methodName = "generate" + chartChoice.getChartTypeName() + "Chart";

   try
   {
      methodHandle =
         MethodHandles.lookup().findVirtual(
            this.getClass(), methodName, methodDescription);
   }
   catch (NoSuchMethodException | IllegalAccessException exception)
   {
      LOGGER.log(
         Level.SEVERE,
         "Unable to acquire MethodHandle to method {0} - {1}",
         new Object[]{methodName, exception.toString()});
   }
   return methodHandle;
}

A series of images follows that shows how these XY Charts appear when rendered by JavaFX.

Area Chart
Bar Chart
Bubble Chart
Line Chart
Scatter Chart

As stated above, Method Handles could have been used to reduce the code even further because individual methods for generating each XYChart are not absolutely necessary and could have been reflectively called based on desired chart type. It's also worth emphasizing that if the x-axis data had been numeric, the code would be the same (and could be reflectively called) for all XYChart types including the Bubble Chart.

JavaFX makes it easy to generate attractive charts representing provided data. Java 7 features make this even easier by making code more concise and more expressive and allowing for easy application of reflection when appropriate.

Friday, January 18, 2013

Java Zero Day Vulnerability Exploits JMX and MethodHandles

I recently identified software security issues (#2), especially related to Java, as one of the most significant software development themes of 2012. Not even a month into 2013, a news story receiving a lot of press is the U.S. Department of Homeland Security's issuing of Alert (TA13-010A), which is described with more technical details in Vulnerability Note VU#625617. Oracle has since released a Security Alert for CVE-2013-0422.

Vulnerability Note VU#625617 includes a paragraph that is particularly insightful:

By leveraging the a vulnerability in the Java Management Extensions (JMX) MBean components, unprivileged Java code can access restricted classes. By using that vulnerability in conjunction with a second vulnerability involving recursive use of the Reflection API via the invokeWithArguments method of the MethodHandle class, an untrusted Java applet can escalate its privileges by calling the the setSecurityManager() function to allow full privileges, without requiring code signing. Oracle Java 7 update 10 and earlier Java 7 versions are affected. OpenJDK 7, and subsequently IcedTea, are also affected. The invokeWithArguments method was introduced with Java 7, so therefore Java 6 is not affected.

The above scenario is described in great detail in Tim Boudreau's excellent The Java Security Exploit in (Mostly) Plain English and he references Java 0day 1.7.0_10 decrypted source code that demonstrates the code that can implement an attack that takes advantage of the described JMX/MethodHandles combination vulnerability. Kafeine's (Malware don't need Coffee) post 0 day 1.7u10 (CVE-2013-0422) spotted in the Wild - Disable Java Plugin NOW ! provides numerous screen snapshots to illustrate this Java Zero-Day Malware in action.

The TA13-010A/CVE-2013-0422 Java Zero Day Vulnerability has made the mainstream news with coverage by Norton/Symantec (What's All the Buzz About Java? Fixing The Vulnerability and Java Zero-Day Dished Up from Cool Exploit Kit), McAfee (Java Zero-Day Vulnerability Pushes Out Crimeware), InformationWeek (Java Zero Day Attack: Second Bug Found), Fox News (Reuters: As Hacking Concerns Build, U.S. Warns on Java Software), CNN (Critical Java vulnerability due to incomplete earlier patch), and many more news outlets.

As stated above, Oracle has issued a patch, but the Department of Homeland Security still recommends disabling Java in the browser.

Thursday, January 17, 2013

Hamcrest Containing Matchers

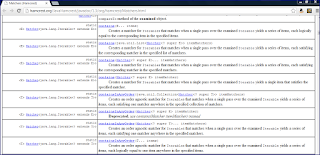
The Hamcrest 1.3 Javadoc documentation for the Matchers class adds more documentation for several of that class's methods than were available in Hamcrest 1.2. For example, the four overloaded contains methods have more descriptive Javadoc documentation as shown in the two comparison screen snapshots shown next.

Although one can figure out how the "contains" matchers work just by trying them out, the Javadoc in Hamcrest 1.3 makes it easier to read how they work. Most Java developers probably think of behavior like that of String.contains(CharSequence) or Collection.contains(Object) when they think of a contains() method. In other words, most Java developers probably think of "contains" as describing if the String/Collection contains the provided characters/objects among other possible characters/objects. However, for Hamcrest matchers, "contains" has a much more specific meaning. As the Hamcrest 1.3 documentation makes much clearer, the "contains" matchers are much more sensitive to number of items and order of items being passed to these methods.

My examples shown here use JUnit and Hamcrest. It is important to emphasize here that Hamcrest's JAR file must appear on the unit tests' classpath before JUnit's JAR file or else I must use the "special" JUnit JAR file built for use with the standalone Hamcrest JAR. Using either of these approaches avoids the NoSuchMethodError and other errors (suc as org.hamcrest.Matcher.describeMismatch error) resulting from mismatched versions of classes. I have written about this JUnit/Hamcrest nuance in the blog post Moving Beyond Core Hamcrest in JUnit.

The next two screen snapshots indicate the results (as shown in NetBeans 7.3) of the unit test code snippets I show later in the blog to demonstrate Hamcrest containing matchers. The tests are supposed to have some failures (7 tests passing and 4 tests failing) to make it obvious where Hamcrest matchers may not work as one expects without reading the Javadoc. The first image shows only 5 tests passing, 2 tests failing, and 4 tests causing errors. This is because I have JUnit listed before Hamcrest on the NetBeans project's "Test Libraries" classpath. The second image shows the expected results because the Hamcrest JAR occurs before the JUnit JAR in the project's "Test Libaries" classpath.

For purposes of this demonstration, I have a simple contrived class to be tested. The source code for that Main class is shown next.

Main.java
package dustin.examples;

import java.util.Collections;
import java.util.HashSet;
import java.util.Set;

/**
 * Main class to be unit tested.
 * 
 * @author Dustin
 */
public class Main
{
   /** Uses Java 7's diamond operator. */
   private Set<String> strings = new HashSet<>();

   public Main() {}

   public boolean addString(final String newString)
   {
      return this.strings.add(newString);
   }

   public Set<String> getStrings()
   {
      return Collections.unmodifiableSet(this.strings);
   }
}

With the class to be tested shown, it is now time to look at building some JUnit-based tests with Hamcrest matchers. Specifically, the tests are to ensure that Strings added via the class's addString(String) method are in its underlying Set and accessible via the getStrings() method. The unit test methods shown next demonstrate how to use Hamcrest matchers appropriately to determine if added Strings are contained in the class's underlying Set

Using Hamcrest contains() Matcher with Single String in Set Works
   /**
    * This test will pass because there is only a single String and so it will
    * contain that single String and order will be correct by implication.
    */
   @Test
   public void testAddStringAndGetStringsWithContainsForSingleStringSoWorks()
   {
      final Main subject = new Main();
      final boolean resultJava = subject.addString("Java");
      final Set<String> strings = subject.getStrings();
      assertThat(strings, contains("Java"));
   }

The unit test shown above passes because the Set only has one String in it and so the order and number of Strings tested with the contains matcher matches.

Using Hamcrest Contains with Same Number of Elements Works if Order Matches
   /**
    * The "contains" matcher expects exact ordering, which really means it should
    * not be used in conjunction with {@code Set}s. Typically, either this method
    * will work and the method with same name and "2" on end will not work or
    * vice versa.
    */
   @Test
   public void testAddStringAndGetStringsWithContainsForMultipleStringsNotWorks1()
   {
      final Main subject = new Main();
      final boolean resultJava = subject.addString("Java");
      final boolean resultGroovy = subject.addString("Groovy");
      final Set<String> strings = subject.getStrings();
      assertThat(strings, contains("Java", "Groovy"));
   }

   /**
    * The "contains" matcher expects exact ordering, which really means it should
    * not be used in conjunction with {@code Set}s. Typically, either this method
    * will work and the method with same name and "1" on end will not work or
    * vice versa.
    */
   @Test
   public void testAddStringAndGetStringsWithContainsForMultipleStringsNotWorks2()
   {
      final Main subject = new Main();
      final boolean resultJava = subject.addString("Java");
      final boolean resultGroovy = subject.addString("Groovy");
      final Set<String> strings = subject.getStrings();
      assertThat(strings, contains("Groovy", "Java"));
   }

The two example unit tests shown above and their resultant output of running those test as shown in the previous screen snapshot show that as long as the number of arguments to the contains() matcher are the same as the number of Strings in the collection being tested, the match may work if the elements tested are in exactly the same order as the elements in the collection. With an unordered Set, this order cannot be relied upon, so contains() is not likely to be a good matcher to use with a unit test on a Set of more than one element.

Using Hamcrest Contains with Different Number of Elements Never Works
   /**
    * Demonstrate that contains will NOT pass when there is a different number
    * of elements asked about contains than in the collection.
    */
   @Test
   public void testAddStringAndGetStringsWithContainsNotWorksDifferentNumberElements1()
   {
      final Main subject = new Main();
      final boolean resultJava = subject.addString("Java");
      final boolean resultGroovy = subject.addString("Groovy");
      final Set<String> strings = subject.getStrings();
      assertThat(strings, contains("Java"));
   }

   /**
    * Demonstrate that contains will NOT pass when there is a different number
    * of elements asked about contains than in the collection even when in
    * different order.
    */
   @Test
   public void testAddStringAndGetStringsWithContainsNotWorksDifferentNumberElements2()
   {
      final Main subject = new Main();
      final boolean resultJava = subject.addString("Java");
      final boolean resultGroovy = subject.addString("Groovy");
      final Set<String> strings = subject.getStrings();
      assertThat(strings, contains("Groovy"));
   }

As the JUnit test results indicate, these two unit tests never pass because the number of elements being tested for in the Set is fewer than the number of elements in the Set. In other words, this proves that the contains() matcher does not test simply for a given element being in a collection: it tests for all specified elements being present and in the specified order. This might be too limiting in some cases, so now I'll move onto some other matches Hamcrest provides for determining if an element is contained in a particular collection.

Using Hamcrest's containsInAnyOrder() Matcher

The containsInAnyOrder matcher is not as strict as the contains() matcher: it allows tested elements to be in any order within the containing collection to pass.

   /**
    * Test of addString and getStrings methods of class Main using Hamcrest
    * matcher containsInAnyOrder.
    */
   @Test
   public void testAddStringAndGetStringsWithContainsInAnyOrder()
   {
      final Main subject = new Main();
      final boolean resultJava = subject.addString("Java");
      final boolean resultCSharp = subject.addString("C#");
      final boolean resultGroovy = subject.addString("Groovy");
      final boolean resultScala = subject.addString("Scala");
      final boolean resultClojure = subject.addString("Clojure");
      final Set<String> strings = subject.getStrings();
      assertThat(strings, containsInAnyOrder("Java", "C#", "Groovy", "Scala", "Clojure"));
   }

   /**
    * Use containsInAnyOrder and show that order does not matter as long as
    * all entries provided are in the collection in some order.
    */
   @Test
   public void testAddStringAndGetStringsWithContainsInAnyOrderAgain()
   {
      final Main subject = new Main();
      final boolean resultJava = subject.addString("Java");
      final boolean resultGroovy = subject.addString("Groovy");
      final Set<String> strings = subject.getStrings();
      assertThat(strings, containsInAnyOrder("Java", "Groovy"));
      assertThat(strings, containsInAnyOrder("Groovy", "Java"));
   }

The two unit tests shown immediately above both pass despite the Strings being tested being provided to the containsInAnyOrder() matcher in a different order than what they could exist in for both collections. However, the less strict containsInAnyOrder() matcher still requires all elements of the containing collection to be specified to pass. The following unit test does not pass because this condition is not met.

   /**
    * This will fail because containsInAnyOrder requires all items to be matched
    * even if in different order. With only one element being tried and two
    * elements in the collection, it will still fail. In other words, order
    * does not matter with containsInAnyOrder, but all elements in the collection
    * still need to be passed to the containsInAnyOrder matcher, just not in the
    * exact same order.
    */
   @Test
   public void testAddStringAndGetStringsWithContainsInAnyOrderDiffNumberElements()
   {
      final Main subject = new Main();
      final boolean resultJava = subject.addString("Java");
      final boolean resultGroovy = subject.addString("Groovy");
      final Set<String> strings = subject.getStrings();
      assertThat(strings, containsInAnyOrder("Java"));
   }
Hamcrest hasItem() and hasItems() Matchers Work As Sounds

As shown in the next two unit test methods (both of which pass), the Hamcrest hasItem() (for single item) and hasItems (for multiple items) successfully tests whether a collection has the one or more than one specified items respectively without regard for order or number of specified items. This really works more like most Java developers are used to "contains" working when working with Strings and collections.

   /**
    * Demonstrate hasItem() will also work for determining a collection contains
    * a particular item.
    */
   @Test
   public void testAddStringAndGetStringsWithHasItem()
   {
      final Main subject = new Main();
      final boolean resultJava = subject.addString("Java");
      final boolean resultGroovy = subject.addString("Groovy");
      final Set<String> strings = subject.getStrings();
      assertThat(strings, hasItem("Groovy"));
      assertThat(strings, hasItem("Java"));
   }

   /**
    * Demonstrate that hasItems works for determining that a collection has one
    * or more items and that the number of items and the order of the items
    * is not significant in determining pass/failure.
    */
   @Test
   public void testAddStringAndGetStringsWithHasItems()
   {
      final Main subject = new Main();
      final boolean resultJava = subject.addString("Java");
      final boolean resultGroovy = subject.addString("Groovy");
      final Set<String> strings = subject.getStrings();
      assertThat(strings, hasItems("Groovy", "Java"));
      assertThat(strings, hasItems("Java", "Groovy"));
      assertThat(strings, hasItems("Groovy"));
      assertThat(strings, hasItems("Java"));
   }
Hamcrest isIn() Matcher Tests Containment from Other Direction

The just-discussed hasItem() and hasItems() matchers are less strict than contains() and even less strict than containsInAnyOrder() and are often what one wants when one wants to simply ensure that one or multiple items are somewhere in a collection without concern about the item's order in that collection or that other possible items are in that collection. One other way to use Hamcrest to determine the same relationship, but from the opposite perspective, is to use isIn matcher. The isIn matcher determines if an item is somewhere with the collection provided to the matcher without regard for that item's order in the collection or whether or not there are other items in that containing collection.

   /**
    * Use isIn matcher to test individual element is in provided collection.
    */
   @Test
   public void testAddStringAndGetStringsWithIsIn()
   {
      final Main subject = new Main();
      final boolean resultJava = subject.addString("Java");
      final boolean resultGroovy = subject.addString("Groovy");
      final Set<String> strings = subject.getStrings();
      assertThat("Groovy", isIn(strings));
      assertThat("Java", isIn(strings));
   }
Conclusion

Hamcrest provides a rich set of matchers that can be used to determine if specified elements reside within a specified collection. Here are important points to keep in mind when deciding to apply these and determining which to use:

  • Ensure that the Hamcrest JAR is on the test classpath before the JUnit JAR.
  • Use contains when you want to ensure that the collection contains all specified items and no other items and you want the collection to contain the items in the specified order.
    • Generally avoid using contains() matcher with Sets because they are unordered by nature.
  • Use containsInAnyOrder matcher when you still want to strictly test for presence of exactly same items in collection as specified in test, but don't care about the order (applicable for Sets).
  • Use hasItem() and hasItems() matchers to ask a collection if it contains, possibly among other unlisted items and in no particular order, the specified item or items.
  • Use isIn() matcher to ask if a particular item is in the specified collection with no regard for whether other items are in that collection or what order that item is in within the containing collection.

Tuesday, January 15, 2013

Book Review: GateIn Cookbook

I recently accepted an invitation to provide a review of a relatively recently released (publication date is listed as November 2012) Packt Publishing book called GateIn Cookbook. This book is, as its name implies, about the JBoss/eXo collaborative GateIn Portal. The cover of the book offers "quick answers to common problems" and describes its contents as "over 60 recipes for building portals with GateIn." Although I am familiar with the portal concept and looked at them in some detail several years ago, it has been a while since I've seriously considered portal technology and I looked forward to reading a book on GateIn.

Including index, preface, table of contents, introductory pages, etc., GateIn Cookbook is nearly 400 pages and is written by three authors: Ken Finnigan ("Technical Lead of the JBoss Portlet Bridge project and a member of the GateIn Development team" at JBoss), Luca Stancapiano, and Piergiorgio Lucidi (Sourcesense).

The Preface

The Preface of GateIn Cookbook states that the book provides "a quick approach to building portals" and is written for "anyone who needs to administer or develop applications on GateIn." According to the Preface, the reader will benefit from familiarity with Java and REST and should have access to one of the three major operating systems (Linux, Mac OX S, Windows), JDK 1.6, Eclipse IDE (to use Eclipse-based JBoss tools, but other Maven-supporting IDEs can be used as well with GateIn and most of the recipes will be workable with any modern Java IDE), Apache Subversion ("latest version"), Apache Maven ("latest version"), and "GateIn Portal 3.2.0 and beyond" to run examples provided in GateIn Cookbook.

Chapter 1: Getting Started

As its title suggests, Chapter 1 is about getting started with GateIn. It seems that "cookbooks" used to assume introductory knowledge and focused on more intermediate and advanced recipes. More recently, it seems to have become more customary for the initial chapters of cookbooks to have more introductory material. I think this is an advantage because it allows the read to use the same book to learn enough basics to start using the new technology.

Chapter 1 introduces GateIn with this description:

GateIn is a portal framework dedicated to implementing highly customizable portal solutions with a powerful set of components based on well-known and adopted open source technologies and standards based on the Java web technologies.

Chapter 1 covers installation of GateIn from a binary package for application/web server-specific bundles for three major versions of JBoss (5.x, 6.x, 7.x), two major versions of Tomcat (6.x, 7.x), and Jetty 6.x. Most of the recipes in the book focus on Tomcat and JBoss AS 6 or 7. Another section of Chapter 1 describes building GateIn from source code retrieved using Subversion and built using Maven.

A recipe in Chapter 1 discusses use of eXo JCR as a JSR 170 Java content repository and PicketLink IDM as a "a common identity model for Identity Management operations." That section also looks at replacing the provided HypersonicSQL database with an Oracle database and with a MySQL database via JDBC driver configuration.

Chapter 1 of GateIn Cookbook has one non-trivial error that I noticed. The authors write that the reader can determine whether the JDK is installed (as opposed to the JRE only being installed I imagine) by running java -version and looking at which version of the JVM is returned by default. Specifically, they state that the presence of the "String Client" indicates the JDK is not installed and the presence of the "String Server" indicates that the JDK is installed. This is not correct.

Chapter 2: Managing Portal Contents Using the GUI

The second chapter discusses GateIn administration using GateIn's "default administration tools" using the graphical dashboard. The covered administrative tasks include creating a portal instance, removing a portal instance, allowing public access to the portal, changing portal layout, creating and removing page instances within a portal, and using/contrasting portlets and gadgets in a portal instance. Not surprisingly for a chapter on graphical administration, this chapter is full of screen snapshots.

Chapter 3: Managing Portal Contents Using XML

The third chapter covers similar material as the second chapter, but demonstrates administration via XML and command-line tooling rather than graphical tooling. Reading Chapters 2 and 3 helps one to see how much easier the graphical interface is than the XML, which seems to me to quickly become unwieldy as the XML files get large.

Chapter 4: Managing Portal Users

The fourth chapter of GateIn Cookbook is about user administration and covers recipes related to creating users, removing users, managing memberships, managing groups, and assigning users to groups. Other recipes in this chapter cover LDAP integration, use of OpenSSO, and use of Simple and Protected GSSAPI Negotiation Mechanism.

Chapter 5: Securing Portal Contents

Chapter 5 of GateIn Cookbook "discusses the configurations aimed at providing security features to portals and all the related components." While Chapter 4 covered authentication, Chapter 5 covers authorization. Its recipes include securing portals, securing pages, securing portlets, and securing applications.

Chapter 6: Developing Portlets

Chapter 6 introduces portlets and the Portlet 2.0 specification (JSR 286) and uses JavaServer Pages (JSP) as the primary view technology. The chapter outlines the basics of applying portlets and summarizes the "three main parts to a portlet": a portlet class, view technology (JSP), and deployment descriptor. Recipes in this chapter also cover multiple ways of communicating between portlets and localizing portlets.

Chapter 7: Developing Using Components API

The seventh chapter of GateIn Cookbook introduces the GateIn-provided "web framework named WebUI (Web User Interface)" and describes it as "similar to JSF because it is based on components." The chapter also mentions that "GateIn has about 400 components provided by WebUI." The chapter shows use of XML for configuration or alternative annotations for configuration. Other recipes include use of Groovy templates and embedding JavaScript in portlets.

Chapter 8: Migrating from Existing Portals

GateIn Cookbook's eighth chapter covers migration from an existing portal to GateIn and introduces JSR 329 ("Portlet 2.0 Bridge for JavaServerTM Faces 1.2 Specification"). One recipe in this chapter focuses on migration from JBoss Portal to GateIn and another recipe focuses on migration of a Liferay portlet to GateIn.

Chapter 9: Managing Gadgets

The ninth chapter of GateIn Cookbook introduces Gadgets and outlines the advantages of Gadgets. The recipes of this chapter make use of Google Gadgets. This is another image-heavy chapter showing different gadgets in place.

Chapter 10: Frameworks in a Portal

The tenth chapter of GateIn Cookbook discussed integration of frameworks with portal development and specifically focuses on use of JavaServer Faces (JSF). Other recipes also cover use of jQuery and RichFaces 4 with portlets.

Chapter 11: Managing Portal Resources with the Management Component

Chapter 11 introduces the management component and describes its purpose as "[enabling] portal resources to be managed over common interfaces such as RESTful Service interfaces, Command Line Interfaces (CLI), and portlets." The CRaSH-based tool CLI tool is demonstrated in a recipe as is exporting a page via a RESTful interface.

Chapter 12: Managing Documents Using External ECM Systems

The final chapter of GateIn Cookbook discusses "Creating a portlet" to integrate with four "Enterprise Content Management (ECM) systems": JBoss ModeShape, Apache JackRabbit, Alfresco using Spring WebScripts, and a Content Management Interoperability Services (CMIS) repository.

Conclusion

I only had a cursory knowledge of portals and portlets before reviewing GateIn Cookbook, but definitely feel more comfortable with those concepts after reviewing this book. It provides general information on portals and portlets with specific focus on implementing portals with GateIn. There are numerous screen snapshots and lots of code (mostly XML, but also Java, Groovy, JavaScript, and more). If I find myself using the GateIn Portal for my next application, GateIn Cookbook would be a good book to have on hand. I found my previous experience with Java, XML, and REST to be useful in more quickly understanding thebook's contents.

Monday, January 14, 2013

Determining JDK Installation

I recently read in a book on a Java-based technology that one can determine if the JDK is installed by running java -version and looking for the the Strings "Client" or "Server" in the output of the version command. The authors of that book state that the presence of "Server VM" means the JDK is installed and the presence of "Client VM" means that the JDK is not installed (presumably implying that the JRE only is present because something is returned). Unfortunately, that is not a sufficient way to determine presence of the JDK. In this post, I look at how one can determine that the JDK is installed and on the path.

Before discussing approaches to determining if the JDK is installed, I first want to show why running java -version and looking for "Server" or "Client" to differentiate presence from absence of JDK is insufficient. The following screen snapshot (with yellow highlighting circles added to it) shows running java -version by itself, running java -client -version, and running java -server -version. The important take-away from this screen snapshot is that the it is the server versus client setting of the running JVM that truly determines whether the String "Server" or "Client" is present in the returned Java version information.

This screen snapshot indicates that the default VM is "Client" for this machine. This is not surprising given that the Server-Class Machine Detection page states that the "Default VM" for operating system "Microsoft Windows" on hardware architecture "i586" is "Default client VM." For most other "Sun-supported" architecture/OS combinations, the default tends to be "Server." On 64-bit architectures, the -client option is ignored and it is always the Server VM that is used, though the Java launcher documentation states that this last observation "is subject to change in a future release."

Running java -version does help determine if the Java application launcher is on the user's path. If it is not on the path, an error message indicating that "java" is a command not found would be expected. One can determine if some version of the JDK is on the path using javac -version. Because the Java compiler only comes with the JDK rather than the JRE, this is a simple test to make sure some version of the JDK is on your system and on your path. The -help flag could also be passed to javac to determine the presence of the JDK, but -version has the added benefit of telling the operator which version of the JDK is on the system and on the path. This is shown in the next screen snapshot.

If javac is not already on your path, running javac -version will return an error message stating that the command is not found. This could only mean that it's not on your path, but is still on your system. You can look for it by searching for the javac command using an operating system search tool (such as in Linux with whereis or find or in Windows with its directory/file search tools or via Control Panel's Uninstall/Change Programs tool). If javac -version is found and returns a version, you can determine which that is on Linux with whereis javac and on Windows with a command like grokster's recommendation:

for %i in (javac.exe) do @echo.   %~$PATH:i

The next screen snapshot shows the Windows Control Panel approach for determining which versions of the JRE and JDK are on the Windows machine.

The "Java 7 Update 11" shown is the Java 7 JRE and does not include the JDK. The "Java SE Development Kit 7 Update 6" is a JDK as tipped off by the "Development Kit" portion.

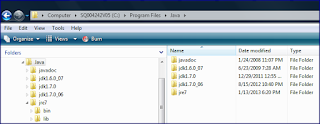
For Windows machines, Java (whether JDK or JRE) might be installed in Program Files/Java and one can examine that directory to see which versions of Java are installed. This is shown in the next screen snapshot.

In the above screen snapshot, the three folders with "jdk" in their names are JDK installations and the folder with "jre" in its name is JRE only (no JDK).

Conclusion

I can understand why the authors of the book I was reading wanted to use presence of "Server" in the VM version information to indicate JDK and "Client" in the VM version to indicate JRE; this would be, if it worked, a much easier way for a reader relatively new to Java to make that determination. Unfortunately, it is not that easy as proven by the StackOverflow thread How to find where is JDK installed on my windows machine? and How do I know if I have Sun Java Development Kit installed? There are quite a few interesting ideas posted in both of those resources.

I didn't even look in this post at the complexity on Windows of multiple JRE deployments because my focus in this post was on finding installed JDKs. By the way, more information on the difference between the client VM and the server VM can be found in Real differences between "java -server" and "java -client"?, Java HotSpot VM Options, and JVM Server vs Client Mode.

Friday, January 11, 2013

Portable Logger Names with Java 7 Method Handles

Java 7 introduced the Method Handles with the java.lang.invoke.MethodHandle and java.lang.invoke.MethodHandles classes. The Well-Grounded Java Developer (which I have previously reviewed) covers method handles in Chapter 5 (Section 5.2) and concludes with a trivial but highly useful example of what one can do with method handles and logger naming. I briefly explain this idea in this blog post.

When acquiring a logger for a particular Java class, it is common for the Java developer to use that very class to name the logger. In Log4j, this is typically done with a reference to the class itself. For java.util.logging, this is typically done with a reference to the fully qualified name of the class. Although this is easy to do, it is possible to mistakenly provide the wrong class, especially when the incorrectly provided class is in the same package and a logger definition statement is copied and pasted from an existing class to a new class. As the authors of The Well-Grounded Java Developer suggest, the newly introduced MethodHandles class can make this declaration more portable and always based contextually on the class in which the declaration resides.

The MethodHandes.lookup() method returns an instance of MethodHandles.Lookup, from which the lookupClass() method can be invoked. This latter method's return value can be used directly in naming the Log4j logger or can have that returned Class's getCanonicalName() method return its name as a String for naming the java.util.logging logger.

The following two code snippets show this for a class specifying its Log4j logger and for a class specifying its java.util.logging logger. Note that there are more characters in these examples than might normally be present when hard-coding the class or class name into the logger declaration, but this code ensures that the actual class or class name is always used.

MethodHandles Approach to Naming log4j Logger
package dustin.examples.methodhandles;

import java.lang.invoke.MethodHandles;
import org.apache.log4j.Logger;

/**
 * Demonstrating use of MethodHandles with Log4j.
 * 
 * @author Dustin
 */
public class MethodHandlesLoggerLog4j
{
   /** Use Java 7 MethodHandles to get my class for logger. */
   private static final Logger LOGGER = Logger.getLogger(MethodHandles.lookup().lookupClass());

   public static void main(final String[] arguments)
   {
      final String msg = "Hello World: Using MethodHandles for Class to associate with Log4j logger.";
      LOGGER.info(msg);
   }
}
MethodHandles Approach to Naming java.util.logging Logger
package dustin.examples.methodhandles;

import java.lang.invoke.MethodHandles;
import java.util.logging.Logger;

/**
 * Demonstrating use of MethodHandles with java.util.logging.
 * 
 * @author Dustin
 */
public class MethodHandlesLoggerJavaUtilLogging
{
   /** Use Java 7 MethodHandles to get my class name for logger. */
   private static final Logger LOGGER =
           Logger.getLogger(MethodHandles.lookup().lookupClass().getCanonicalName());

   public static void main(final String[] arguments)
   {
      final String msg = "Hello World: Using MethodHandles for Class to associate with java.util.logging logger.";
      LOGGER.info(msg);
   }  
}

This post has looked at an idea for a very simple use of the newly available Java 7 MethodHandles class as covered in The Well-Grounded Java Developer. Although this is a small thing, it is illustrative of a convenient use of a lesser advertised Java 7 language feature that provides many more and far more powerful (and more complex) uses.