NetBeans offers file creation wizards for many types of files and W3C XML Schema files (
.xsd) are no exception. The screen snapshot that follows (click on all screen snap shots in this blog to see larger version) shows my simple XML Schema file after the wizard created the root tag (xsd:schema with its namespaces and I had added the body of the document.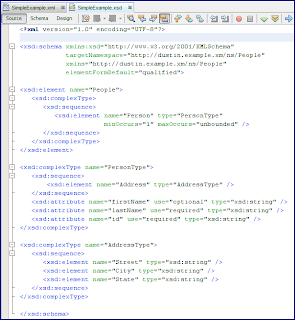
The screen snapshot above shows NetBeans' "Source" view of this schema file. NetBeans also provides a "Design" view of an XML Schema file and this is shown next for the example schema.
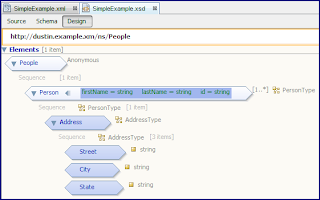
Once you have access to an XML Schema file, it is very easy with NetBeans to create Java classes that bind to that schema. I will demonstrate this next with the
SimpleExample.xsd schema file shown in the two screen snapshots above. To use JAXB and NetBeans to generate Java classes from an existing XML Schema file, simply choose "JAXB Binding" from the allowable file types (under "XML" category). This is shown in the next screen snapshot.
Once I have selected "JAXB Binding" as my new file type, the next screen in the wizard is the "New JAXB Binding: Configure XML Binding" window and that is shown in the next screen snapshot.
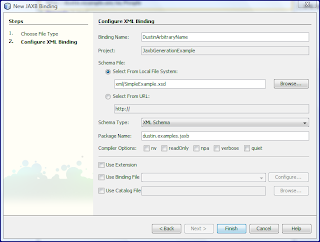
Once I click on the "Finish" button, NetBeans will generate the appropriate Java classes that bind to XML that conforms to the provided XML Schema. Both the "Projects" view and the "Files" view show the results of this. From the "Files" view, I can see the generated
.class files as shown in the following screen snapshot.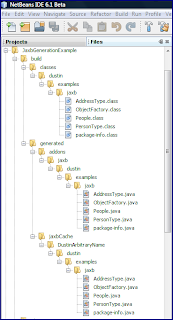
The "Projects" view shows that my newly created JAXB Bindings has been added to the project with the arbitrary name I provided it ("DustinArbitraryName"). The next screen snapshot shows this.
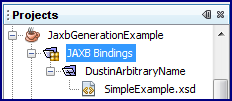
In the "Projects" view, there are a few things of interest that I can do at this point. First, I can right-click on "JAXB Bindings" and click on the option "Regenerate Java Code" to regenerate the Java
.class files based on the XML Schema. This would be useful, of course, whenever the XML Schema changes. However, it is important to note here that the XML Schema associated with this "JAXB Bindings" entry is a copy of the original XML schema from which I generated the JAXB Bindings. In other words, if I change the original schema file, those changes won't be reflected in the generated Java classes even when I use this "Regenerate Java Code" option. There is an intermediate step I must take in that case and this is discussed next.To update the "JAXB Bindings" copy of the XML Schema with any changes I make to the original XML Schema file, I must right-click on the schema's name (in this case
SimpleExample.xsd) under the JAXB Bindings name (in this case "DustinArbitraryName"). I can then click on the option "Refresh" to refresh this JAXB Binding's copy of the XML schema to match the original one that I have changed. This is shown in the next screen snapshot.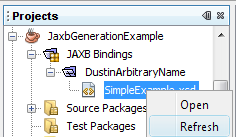
To summarize how to update the JAXB Bindings whenever you update your original XML Schema, you must perform the following steps:
1. Edit and save the original XML Schema file in NetBeans.
2. Right-click on the schema file's name under the JAXB Bindings area and click on the "Refresh" option. This will update the JAXB Binding's copy to match the original copy of the XML Schema file.
3. Right-click on JAXB Bindings and click on the "Regenerate Java Code" option. New Java
.class files will be generated for the new XML Schema file.There are times you may want to regenerate the
.class files ("Regenerate Java Code") without refreshing the XML Schema (don't need to use "Refresh"). The most likely scenario for this is when you want to change something about the JAXB mapping used in generating the Java classes, but still use the same existing XML Schema source file. In such a case, you right-click on the JAXB Bindings name (in this case DustinArbitraryName) and select the option "Change JAXB Options." This is shown in the next screen snapshot.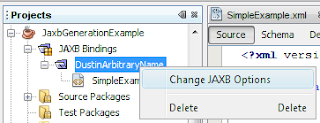
When the option to "Change JAXB Options" is selected a window very similar to the one we saw earlier for creating a new JAXB Bindings is shown. The only difference is that this is titled "Change JAXB Options" rather than "New JAXB Options." As with the "New JAXB Options" window, the "Change JAXB Options" window allows for the developer to provide a binding file, a catalog file, whether vendor JAXB extensions should be allowed, and five JAXB compiler options.
The NetBeans 6.0 "Getting Started with JAXB" tutorial covers what these JAXB Bindings options are. The tutorial describes what it means to check Catalog File, Binding File, Extension, and the five compiler options.
NetBeans 6 (and 6.1 beta) make using JAXB to create Java binding classes from an existing XML Schema document easier for the developer, especially considering that the generated class files are automatically placed in the appropriate classes output directory in a NetBeans project. The wizard simplifies the process, but leaves many options open for customization such as vendor extensions and custom binding files.
By the way, as you've likely heard by now, there is a NetBeans IDE 6.1 Beta Blogging Contest that ends on April 19. This blog entry has been submitted as an entry into that contest.
1 comment:
Good article on JPA with NetBeans 6.1 :
JPA NetBeans
Post a Comment