Although modern search engines have made it easier than ever to look up various details, it is still sometimes nice to have a go-to resource to refresh my memory about certain development tasks. I first started to appreciate materials like this when I encountered the famous Oracle data dictionary wall posters (such as this TUSC-provided poster and the Quest poster). In this blog post, I point to and briefly summarize some of my favorite development-related cheat sheets.
There are too many useful DZone-provided Refcardz ("Free Cheat Sheets for Developers") to cover them all here, but I will focus on a few individual examples of them in this blog post. I call them out here separately because there are so many of them on so many different subjects. These require registration with DZone/JavaLobby, but that is free. Although I only list a small sample of these DZone refcardz in conjunction with other development-related cheat sheets listed in this post, it should still be obvious that a single free registration with DZone to be able to download so many useful cheat sheets doesn't seem so onerous.
Java Cheat Sheets
Java Collections
Java Collections Cheatsheet
When I was first learning Java in the mid- to late- 1990s, I wished there was a good visual summary of the different Java collections. Java collections have changed dramatically since then and increased in size and variety and so such a visual summary is even more desirable now. Coder-Friendly has made just such a thing available in the Java Collections Cheatsheet. Not only does this show collections-related hierarchical information and Big O notation for various operations on the various collections types, but it is also inspired by one of my favorite intermediate to advanced Java books (Java Generics and Collections).
General Java
Java Quick Reference
Java 1.5 Cheat Sheet
Java Reference Sheet
Jialong He's Java Quick Reference and Project Encycode's Java Cheat Sheet seems a little dated now, but can still be useful for a quick perusal of Java basics and overview of some of the JDK's packages. Pete Freitag's Java 1.5 Cheat Sheet adds some specific new features of J2SE 5.
Java Persistence API
Getting Started with JPA
TopLink JPA Annotation Reference
Mike Keith's DZone-provided (Refcardz #22) Getting Started with JPA provides an introduction to JPA and a good resource of the JPA basics. The TopLink JPA Annotation Reference is also helpful when developing with JPA.
XML in Java
Using XML in Java
The DZone refcardz Using XML in Java (#35) is written by Masoud Kalali and
Groovy Cheat Sheets
Groovy Refcardz
Although Dierk König's DZone-provided DZone Groovy Refcardz (#15) requires (free) registration, it is significantly more up-to-date (2008) and comprehensive (7 pages) than the 2004 Groovy Reference Summary.
Flex / AIR Cheat Sheets
Very First Steps in Flex
Getting Started with BlazeDS
AIR Cheat Sheets
Very First Steps in Flex is written by Bruce Eckel and James Ward and is available as a DZone Refcardz. Getting Started with BlazeDS is also a DZone refcardz (#75) and is written by Shashank Tiwari. The AIR Cheat Sheets do not require any registration to download the PDF.
Other Web Development
HTML
Core HTML
The DZone-provided Andy Harris Refcardz Core HTML (#64) covers HTML and XHTML along with brief mention of HTML 5 and Cascading Style Sheets.
HTML 5 Cheat Sheet (PDF)
Speaking of HTML 5, the HTML 5 Cheat Sheet (AKA HTML 5 Quick Reference Guide) from Chris Hanscom and Smashing Magazine summarizes this emerging standard's markup tags.
CSS
Core CSS: Parts I, II, and III
Speaking of CSS, there is a whole DZone Refcardz series written by Molly E. Holzschlag dedicated to CSS: Core CSS: Part I (#19), Core CSS: Part II (#25), Core Css: Part III (#34).
Veign's CSS3 Quick Reference Guide
If you are not registered with DZone (and refuse to do so), you can download the CSS3 Quick Reference Guide from Veign and Chris Hanscom without registration.
Showing posts with label Flex. Show all posts
Showing posts with label Flex. Show all posts
Friday, January 8, 2010
Monday, February 9, 2009
Flex: Proxied HTTPService and REST
My article Java EE and Flex: A compelling combination, Part 2 was published on JavaWorld last week. In that article, I briefly discussed some of the extra features that BlazeDS adds to HTTPService beyond what is support with Flex's
I have previously blogged on some of these advantages of HTTPService with BlazeDS. In this blog posting, I plan to focus on something outside of the scope of both the article and previously blog posting: how BlazeDS allows the Flex
In the JavaWorld article, I wrote the following: "Another advantage of using HTTPService in conjunction with BlazeDS is that you can use HTTP methods beyond GET and POST (the only two supported in HTTPService without the proxy service)." I will use the remainder of this blog posting to expand on this and illustrate this with examples.
To illustrate the differences between HTTP methods supported by non-proxied
FlexHttpClient.mxml
The above MXML file contains most of the layout for the simple application and includes the configuration of the proxied and non-proxied instances of HTTPService. You may have noticed that there are actually four instances of HTTPService. Two instances are the proxied and non-proxied instances for testing the different HTTP methods while the other two instances are the proxied and non-proxied instances used to test handling of HTTP response codes. I will not cover the latter two in this post, but plan to cover response code handling in a future post.
I intentionally placed the static layout MXML code in the file above. I factored the event handling code, written in ActionScript, into two separate files that are included by the MXML code above. These two ActionScript files are shown next.
HttpMethodHandling.as
ResponseCodeHandling.as
The MXML file and two ActionScript files shown above constitute the client side of this example. Now, a HTTP-exposed server side is required to complete the example. This is implemented using a Java servlet. The servlet, which passes back a simple String indicating that a particular HTTP method has been called, is shown next.
SimpleHttpServer.java
With this servlet in place, we can now look at the differences between HTTP method handling for
Without BlazeDS (or similar proxy server support), the Flex
Non-Proxied HTTPService GET

Non-Proxied HTTPService POST

Non-Proxied HTTPService PUT

Non-Proxied HTTPService DELETE

Non-Proxied HTTPService OPTIONS

Non-Proxied HTTPService TRACE

In the non-proxied
The next series of screen snapshots show the same
Proxied HTTPService GET

Proxied HTTPService POST

Proxied HTTPService PUT

Proxied HTTPService DELETE

Proxied HTTPService OPTIONS

Proxied HTTPService TRACE

The results shown in the sample Flex client for BlazeDS-proxied HTTPService instances are more interesting than the non-proxied counterparts. The GET and POSt work the same for both proxied and non-proxied, but the other HTTP methods have different results in the proxied versions than in the non-proxied versions. In the screen snapshots of the results of the TRACE and OPTIONS calls, I took advantage of the Flex Label feature that displays an automatic truncation tip when the contents of the
The results for PUT and DELETE are not quite as encouraging. While we see "null" in the text field, all is not lost. The result handler is called when the HTTP PUT or DELETE invocation returns, but the text does not get populated. Also, we can see that the PUT and DELETE are being called when we look at the GlassFish log as shown in the next screen snapshot.

In the GlassFish log record shown immediately above, log record number 300 represents the GET initially performed when the Flex application's
It is nice to be able to use Flex's
As mentioned earlier, BlazeDS also makes
Addition (March 2010)
Christian Junk pointed out that I had not included the piece of MXML code defining
Conclusion
BlazeDS allows Flex developers to use a wider range of HTTP methods. This is one of the many advantages that BlazeDS offers for proxied
Additional Resources
There are several good blog postings on using Flex with HTTP and REST. A particularly insightful resource is the StackOverflow thread Is It Feasible to Create a REST Client with Flex?.
HTTPService out of the box without BlazeDS.I have previously blogged on some of these advantages of HTTPService with BlazeDS. In this blog posting, I plan to focus on something outside of the scope of both the article and previously blog posting: how BlazeDS allows the Flex
HTTPService to be used with HTTP methods other than GET and POST.In the JavaWorld article, I wrote the following: "Another advantage of using HTTPService in conjunction with BlazeDS is that you can use HTTP methods beyond GET and POST (the only two supported in HTTPService without the proxy service)." I will use the remainder of this blog posting to expand on this and illustrate this with examples.
To illustrate the differences between HTTP methods supported by non-proxied
HTTPService (out-of-the-box without BlazeDS) and proxied HTTPService (with BlazeDS), I have put together a very simple Flex application that connects to a back-end HTTP-exposed server using both non-proxied and proxied HTTPService clients. The main MXML source code for this simple illustrative example is shown next.FlexHttpClient.mxml
<?xml version="1.0" encoding="UTF-8" ?>
<mx:Application xmlns:mx="http://www.adobe.com/2006/mxml"
                xmlns:dustin="components.*"
                width="800" height="500"
  applicationComplete="invokeServer('GET');">

   <mx:Script>
   import mx.controls.Alert;
   import mx.events.ItemClickEvent;
   import flash.events.MouseEvent;
   import mx.rpc.events.FaultEvent;
   import mx.rpc.events.ResultEvent;
   import mx.utils.ObjectUtil;

   include "includes/HttpMethodHandling.as";
   include "includes/ResponseCodeHandling.as";
   </mx:Script>

   <mx:HTTPService id="httpServiceProxied"
                   useProxy="true"
                   resultFormat="object"
                   destination="DefaultHTTP"
                   fault="faultHandler(event);"
                   result="proxiedResultHandler(event);">
      <mx:request>
         <id>5</id>
      </mx:request>
   </mx:HTTPService>

   <mx:HTTPService id="httpService"
                   useProxy="false"
                   resultFormat="object"
                   url="http://localhost:8080/RESTfulFlex/httpServer"
                   fault="faultHandler(event);"
                   result="nonProxiedResultHandler(event);">
      <mx:request>
         <id>5</id>
      </mx:request>
   </mx:HTTPService>

   <mx:HTTPService id="httpServiceResponseCodes"
                   useProxy="false"
     resultFormat="object"
     method="GET"
     url="http://localhost:8080/RESTfulFlex/responseCodes"
     fault="responseCodesFaultHandler(event);"
     result="resultCodeHandler(event);">
      <mx:request>
         <requestedCode>{desiredHttpCode.text}</requestedCode>
      </mx:request>
   </mx:HTTPService>

   <mx:HTTPService id="httpServiceResponseCodesProxied"
                   useProxy="true"
     resultFormat="object"
     method="GET"
     destination="DefaultHttpResponseCode"
     fault="responseCodesFaultHandler(event);"
     result="proxiedResultCodeHandler(event);">
      <mx:request>
         <requestedCode>{desiredHttpCode.text}</requestedCode>
      </mx:request>
   </mx:HTTPService>

   <mx:TabNavigator id="tabs" width="750" height="450">
      <mx:Panel id="mainPanel"
                title="Flex HTTPService Demonstrated"
  label="HTTPService Demonstrated">
         <mx:Form>
            <dustin:ProxySelectorFormItem label="To Proxy or Not To Proxy?"
                                   selectorHandler="setProxyStatus" />
            <mx:FormItem label="Select HTTP Method">
        <mx:RadioButtonGroup id="method" itemClick="invokeHttpMethod(event);"/>
               <mx:RadioButton groupName="method" id="get" label="GET"/>
               <mx:RadioButton groupName="method" id="post" label="POST"/>
               <mx:RadioButton groupName="method" id="put" label="PUT"/>
        <mx:RadioButton groupName="method" id="remove" label="DELETE"/>
        <mx:RadioButton groupName="method" id="options" label="OPTIONS"/>
        <mx:RadioButton groupName="method" id="trace" label="TRACE"/>
     </mx:FormItem>
            <mx:FormItem label="HTTP Method Invoked">
               <mx:Label id="serviceResults" />
     </mx:FormItem>
         </mx:Form>
      </mx:Panel>
      <mx:Panel id="responseCodePanel"
                title="HTTP Response Codes"
  label="HTTP Response Codes">
         <mx:Form>
            <dustin:ProxySelectorFormItem
             label="Proxied?"
             selectorHandler="setResponseCodesProxyStatus" />
     <mx:FormItem label="Desired Return Code">
        <mx:TextArea id="desiredHttpCode" />
     </mx:FormItem>
     <mx:FormItem>
        <mx:Button label="Submit Desired Response Code"
                   click="invokeHttpResponseCodes(event);"/>
     </mx:FormItem>
     <mx:FormItem label="Returned Text">
        <mx:Text id="returnedHttpResponse" />
     </mx:FormItem>
  </mx:Form>
      </mx:Panel>
   </mx:TabNavigator>

</mx:Application>
The above MXML file contains most of the layout for the simple application and includes the configuration of the proxied and non-proxied instances of HTTPService. You may have noticed that there are actually four instances of HTTPService. Two instances are the proxied and non-proxied instances for testing the different HTTP methods while the other two instances are the proxied and non-proxied instances used to test handling of HTTP response codes. I will not cover the latter two in this post, but plan to cover response code handling in a future post.
I intentionally placed the static layout MXML code in the file above. I factored the event handling code, written in ActionScript, into two separate files that are included by the MXML code above. These two ActionScript files are shown next.
HttpMethodHandling.as
/** true if proxied service is to be used; false otherwise. */
[Bindable] private var proxiedService:Boolean = false;

/**
 * Invoke HTTPservice with HTTP method specified by parameter.
 *
 * @param httpMethod HTTP method to be used.
 */
private function invokeServer(httpMethod:String):void
{
   if (proxiedService)
   {
      httpServiceProxied.method = httpMethod;
    httpServiceProxied.send();
   }
   else
   {
      httpService.method = httpMethod;
    if (httpMethod == "POST")
      {
         const dummyObject:Object = { "key" : "value" };
         httpService.send(dummyObject);
      }
      else
      {
            httpService.send();
      }
   }
}

/**
 * Handler for HTTP method selected from radio button group
 *
 * @param event Event associated with clicking of radio button to select HTTP
 *    method.
 */
private function invokeHttpMethod(event:ItemClickEvent):void
{
   serviceResults.text = "Loading ...";
   const selectedHttpMethod:String = event.currentTarget.selectedValue;
   invokeServer(selectedHttpMethod);
}

/**
 * Handler for radio button group used to determine if proxied or non-proxied
 * HTTPService is to be used.
 */
private function setProxyStatus(event:ItemClickEvent):void
{
   const proxyStatus:String = event.currentTarget.selectedValue;
   proxiedService = (proxyStatus == "BlazeDS Proxied");
}

/**
 * Fault handler for faults encountered during a service call.
 *
 * @param event Fault Event needing to be handled.
 */
private function faultHandler(event:FaultEvent):void
{
   serviceResults.text = "Failure trying to access service.\n"
      + event.fault.faultString + "\n" + event.fault.faultDetail;
}

/**
 * Results handler for result of proxied HTTPService invocation.
 *
 * @param event Result Handler for proxied HTTPService call.
 */
private function proxiedResultHandler(event:ResultEvent):void
{
   serviceResults.text = ObjectUtil.toString(httpServiceProxied.lastResult);
}

/**
 * Results handler for result of non-proxied HTTPService invocation.
 *
 * @param event Result Handler for non-proxied HTTPService call.
 */
private function nonProxiedResultHandler(event:ResultEvent):void
{
   Alert.show("Non-Proxied Result Handler Accessed!");
   serviceResults.text = ObjectUtil.toString(httpService.lastResult);
}
ResponseCodeHandling.as
/** true if proxied service is to be used; false otherwise. */
[Bindable] private var responseCodesProxiedService:Boolean = false;

/**
 * Handler for invoking of response codes service.
 *
 * @param event Event associated with clicking of radio button to submit
 *    response code.
 */
private function invokeHttpResponseCodes(event:MouseEvent):void
{
   returnedHttpResponse.text = "Loading ...";
   if (responseCodesProxiedService)
   {
      httpServiceResponseCodesProxied.send();
   }
   else
   {
      httpServiceResponseCodes.send();
   }
}

/**
 * Handler for radio button group used to determine if proxied or non-proxied
 * HTTPService is to be used for response code service.
 */
private function setResponseCodesProxyStatus(event:ItemClickEvent):void
{
   const proxyStatus:String = event.currentTarget.selectedValue;
   responseCodesProxiedService = (proxyStatus == "BlazeDS Proxied");
}

/**
 * Results handler for result of service call for HTTP response code.
 *
 * @param event Result Handler for non-proxied response code reply.
 */
private function resultCodeHandler(event:ResultEvent):void
{
   returnedHttpResponse.text =
      "SUCCESS: " + ObjectUtil.toString(httpServiceResponseCodes.lastResult);
}

/**
 * Results handler for result of service call for HTTP response code that is
 * based on a proxied call.
 *
 * @param event Result Handler for proxied response code reply.
 */
private function proxiedResultCodeHandler(event:ResultEvent):void
{
   returnedHttpResponse.text =
      "SUCCESS: " + ObjectUtil.toString(httpServiceResponseCodesProxied.lastResult);
}

/**
 * Fault handler for faults encountered during a service call on the
 * response codes service.
 *
 * @param event Fault Event that needs to be handled.
 */
private function responseCodesFaultHandler(event:FaultEvent):void
{
   returnedHttpResponse.text = "ERROR: Failure trying to access service.\n"
      + event.fault.faultString + "\n" + event.fault.faultDetail;
}
The MXML file and two ActionScript files shown above constitute the client side of this example. Now, a HTTP-exposed server side is required to complete the example. This is implemented using a Java servlet. The servlet, which passes back a simple String indicating that a particular HTTP method has been called, is shown next.
SimpleHttpServer.java
package dustin.flex.rest;

import java.io.IOException;
import java.io.PrintWriter;
import java.util.logging.Logger;
import javax.servlet.http.HttpServlet;
import javax.servlet.http.HttpServletRequest;
import javax.servlet.http.HttpServletResponse;


/**
 * Simplistic Java EE server-side application intended for demonstration of
 * Flex HTTPService capabilities with and without BlazeDS.
 *
 * @author Dustin
 */
public class SimpleHttpServer extends HttpServlet
{
   /** Set up java.util.Logger. */
   private static Logger LOGGER =
      Logger.getLogger("dustin.flex.rest.SimpleHttpServer");

   /**
    * Servlet method responding to HTTP GET methods calls.
    *
    * @param request HTTP request.
    * @param response HTTP response.
    */
   @Override
   public void doGet( HttpServletRequest request,
                      HttpServletResponse response ) throws IOException
   {
      LOGGER.warning("[DUSTIN] doGet() Accessed!");
      final PrintWriter out = response.getWriter();
      final String requestId = request.getParameter("id");
      out.write("GET method (retrieving data) was invoked with ID " + requestId + "!");
   }

    /**
    * Servlet method responding to HTTP POST methods calls.
    *
    * @param request HTTP request.
    * @param response HTTP response.
    */
   @Override
   public void doPost( HttpServletRequest request,
                       HttpServletResponse response ) throws IOException
   {
      LOGGER.warning("[DUSTIN] doPost() Accessed!");
      final PrintWriter out = response.getWriter();
      out.write("POST method (changing data) was invoked!");
   }

   /**
    * Servlet method responding to HTTP PUT methods calls.
    *
    * @param request HTTP request.
    * @param response HTTP response.
    */
   @Override
   public void doPut( HttpServletRequest request,
                      HttpServletResponse response ) throws IOException
   {
      LOGGER.warning("[DUSTIN] doPut() Accessed!");
      final PrintWriter out = response.getWriter();
      final String requestId = request.getParameter("id");
      out.write("PUT method (inserting data) was invoked with ID " + requestId + "!");
      response.setStatus(HttpServletResponse.SC_CREATED);
   }

    /**
    * Servlet method responding to HTTP DELETE methods calls.
    *
    * @param request HTTP request.
    * @param response HTTP response.
    */
   @Override
   public void doDelete( HttpServletRequest request,
                         HttpServletResponse response ) throws IOException
   {
      LOGGER.warning("[DUSTIN] doDelete() Accessed!");
      response.setStatus(HttpServletResponse.SC_OK);
      final PrintWriter out = response.getWriter();
      final String requestId = request.getParameter("id");
      out.write("DELETE method (removing data) was invoked with ID " + requestId + "!");
   }

   @Override
   public String getServletInfo()
   {
      return "Provide examples of HTTP methods invoked by clients.";
   }
}
With this servlet in place, we can now look at the differences between HTTP method handling for
HTTPService with and without BlazeDS. I will be using GlassFish to host all server-side code shown in this blog posting.Without BlazeDS (or similar proxy server support), the Flex
HTTPService only supports the GET and POST methods. I previously blogged about even the POST in a non-proxied HTTPService being treated like a GET in some cases. The example code above does use a body in the POST request to ensure that it is treated like a POST. As the following screen snapshots indicate, all of the other major HTTP methods (PUT, DELETE, OPTIONS, TRACE) are treated as GET methods. POST is treated like a POST.Non-Proxied HTTPService GET

Non-Proxied HTTPService POST

Non-Proxied HTTPService PUT

Non-Proxied HTTPService DELETE

Non-Proxied HTTPService OPTIONS

Non-Proxied HTTPService TRACE

In the non-proxied
HTTPService examples illustrated above, all of the HTTP methods were treated as GET except for the POST method. As stated earlier, even that can be treated as a GET if no body is included in the request.The next series of screen snapshots show the same
HTTPService calls as before, but with a BlazeDS proxy used now.Proxied HTTPService GET

Proxied HTTPService POST

Proxied HTTPService PUT

Proxied HTTPService DELETE

Proxied HTTPService OPTIONS

Proxied HTTPService TRACE

The results shown in the sample Flex client for BlazeDS-proxied HTTPService instances are more interesting than the non-proxied counterparts. The GET and POSt work the same for both proxied and non-proxied, but the other HTTP methods have different results in the proxied versions than in the non-proxied versions. In the screen snapshots of the results of the TRACE and OPTIONS calls, I took advantage of the Flex Label feature that displays an automatic truncation tip when the contents of the
Label are larger than the label and no tooltip is provided for the Label. We can see that when BlazeDS is used, HTTPService can "see" the options returned by the server and can see the traced route.The results for PUT and DELETE are not quite as encouraging. While we see "null" in the text field, all is not lost. The result handler is called when the HTTP PUT or DELETE invocation returns, but the text does not get populated. Also, we can see that the PUT and DELETE are being called when we look at the GlassFish log as shown in the next screen snapshot.

In the GlassFish log record shown immediately above, log record number 300 represents the GET initially performed when the Flex application's
applicationComplete event is triggered. Log record 301 is the explicit non-proxied GET and log record 302 is the explicit non-proxied POST. Log records 303 through 306 are the PUT, DELETE, OPTIONS, and TRACE non-proxied calls treated like GETs. Log record 307 is the BlazeDS-proxied GET and log record 308 is the BlazeDS-proxied POST. Log record 309 and log record 310 are clearly the proxied PUT and DELETE calls as evidenced by the WARNING text. This also proves that the server-side doPut() and doDelete() methods were in fact invoked.It is nice to be able to use Flex's
HTTPService with BlazeDS to use a more complete range of the standard HTTP methods. I would like to find out if there is a way to return a non-null body from PUT and DELETE calls so that the REST-inspired concept of Hypermedia as the Engine of Application State (HATEOAS) might be more fully realized for those two HTTP methods.As mentioned earlier, BlazeDS also makes
HTTPService more useful by improving its handling of HTTP response codes similarly to how it improves HTTPService's handling of HTTP method differentiation. I hope to cover this BlazeDS-improved handling of HTTP response codes in a future blog post.Addition (March 2010)
Christian Junk pointed out that I had not included the piece of MXML code defining
ProxySelectorFormItem. That code is shown next and this sample comes from a file called ProxySelectorFormItem.mxml.
<?xml version="1.0" encoding="utf-8"?>
<mx:FormItem xmlns:mx="http://www.adobe.com/2006/mxml"
             xmlns:dustin="components.*">
   <mx:Script>
   <![CDATA[
   [Bindable] public var selectorHandler:Function;
   [Bindable] public var proxiedLabel:String = "BlazeDS Proxied";
   [Bindable] public var nonProxiedLabel:String = "Not Proxied";
   ]]>
   </mx:Script>

   <mx:RadioButtonGroup id="proxyStatus" itemClick="{selectorHandler(event)}"/>
   <mx:RadioButton groupName="proxyStatus" id="proxy" label="{proxiedLabel}" />
   <mx:RadioButton groupName="proxyStatus" id="nonproxy" label="{nonProxiedLabel}" />

</mx:FormItem>
Conclusion
BlazeDS allows Flex developers to use a wider range of HTTP methods. This is one of the many advantages that BlazeDS offers for proxied
HTTPService when compared to non-proxied HTTPService.Additional Resources
There are several good blog postings on using Flex with HTTP and REST. A particularly insightful resource is the StackOverflow thread Is It Feasible to Create a REST Client with Flex?.
- Is It Feasible to Create a REST Client with Flex?
- resthttpservice is another Dustin's project for a fully REST-compliant HTTPService component
- as3httpclient is another project for enhanced Flex HTTP capabilities
- Making HTTP Calls in ActionScript 3
- Forum Thread on HTTPService and DELETE Method
- Flex is Not Friendly to REST
- Can AS3 Do REST or Not?
- Flex Can't Do REST
- A Simple ActionScript/Flex REST Client
- Flex Bug Report: SDK-12200
- BlazeDS Beta 1 Review with information on better REST support
Thursday, January 22, 2009
Flex HTTPService: When POST is GET
A relatively infrequently encountered nuance of Flex 3's MXML/ActionScript's HTTPService that one may run into occurs when the HTTPService.method public property is set to "POST", but the server actually receives a GET HTTP method instead of the anticipated POST. As documented in Http Service Get vs Post Issue? IS this a bug? and HttpService Post Shows as Get on Server Logs, this occurs when the HTTPService with the method set to "POST" has its send method invoked without any parameters.
In the unlikely event that it is important to have the POST request treated as POST on the server despite having no parameters to pass, one can use a dummy parameter to cause this to happen. The remainder of this blog posting will focus on code examples of this.
The HTTPService can be declared as an MXML tag as shown next.
The HTTPService instance shown above can have its method set to HTTP POST and be invoked as shown in the next ActionScript snippet.
Although the method is clearly set to POST, if no parameters are passed, it will actually be treated like a GET instead of a POST. A dummy object can be added to force the POST to be treated like a POST as shown in the next ActionScript code snippet.
Using the dummy object as shown above will force the POST to be treated as a POST. Note that parameters for an HTTPService invocation can be specified not only in the send() method, but can also be specified in the HTTPService declaration with the <mx:request> element.
While it at first seems a little strange that a POST is treated as a GET if no parameter is supplied, it does not seem nearly as strange when one considers that an HTTP POST is designed to serve as a resource-changing method and a parameter (enclosed entity) will typically be associated with such functionality. Conversely, an HTTP GET is a safe and idempotent method designed for retrieval of data and is probably the more usual HTTP method of the two to be called when no parameter is specified.
Finally, it is worth noting here that when the proxied HTTPService is used (such as with BlazeDS), POST is used when the method is set to POST regardless of whether a parameter is included or not.
In the unlikely event that it is important to have the POST request treated as POST on the server despite having no parameters to pass, one can use a dummy parameter to cause this to happen. The remainder of this blog posting will focus on code examples of this.
The HTTPService can be declared as an MXML tag as shown next.
   <mx:HTTPService id="httpService"
                   useProxy="false"
                   resultFormat="object"
                   url="http://localhost:8080/httpServer"
                   fault="faultHandler(event)"
                   result="resultHandler(event)" />
The HTTPService instance shown above can have its method set to HTTP POST and be invoked as shown in the next ActionScript snippet.
   httpServiceProxied.method = "POST";
   httpServiceProxied.send();
Although the method is clearly set to POST, if no parameters are passed, it will actually be treated like a GET instead of a POST. A dummy object can be added to force the POST to be treated like a POST as shown in the next ActionScript code snippet.
   const dummyObject:Object = { "key" : "value" };
   httpServiceProxied.method = "POST";
   httpServiceProxied.send(dummyObject);
Using the dummy object as shown above will force the POST to be treated as a POST. Note that parameters for an HTTPService invocation can be specified not only in the send() method, but can also be specified in the HTTPService declaration with the <mx:request> element.
While it at first seems a little strange that a POST is treated as a GET if no parameter is supplied, it does not seem nearly as strange when one considers that an HTTP POST is designed to serve as a resource-changing method and a parameter (enclosed entity) will typically be associated with such functionality. Conversely, an HTTP GET is a safe and idempotent method designed for retrieval of data and is probably the more usual HTTP method of the two to be called when no parameter is specified.
Finally, it is worth noting here that when the proxied HTTPService is used (such as with BlazeDS), POST is used when the method is set to POST regardless of whether a parameter is included or not.
Monday, January 19, 2009
AIR-ifying a Flex/BlazeDS/Java EE Application
In my first blog post of 2009, I covered a simple example of applying BlazeDS's object remoting capabilities to associate a Flex client with a Java EE server. In this, my 250th overall blog posting, I intend to demonstrate how simple it is to adapt that Flex+BlazeDS application into an AIR+BlazeDS application.
Adobe Integrated Runtime (AIR) allows developers to apply their web development skills to desktop development. While AIR applications can be built from a starting point of DHTML/Ajax/JavaScript, I will be transitioning the Flex application demonstrated in my earlier blog posting into an AIR application for this example.
Douglas McCarroll provides informative coverage of a transition of a Flex application using BlazeDS remoting to an AIR application using BlazeDS remoting in his blog entry A Simple AIR / BlazeDS / Remoting Example. My posting here is a little different from his because mine does not rely on FlexBuilder, my example uses the same XML-based, statically configured channels used in the Flex example (McCarroll demonstrates dynamic, ActionScript-based configuration in his example), and I include some screen snapshots in this posting. Two other AIR+BlazeDS blog postings include Connecting an AIR Client with BlazeDS Using Spring/Hibernate and Connecting AIR with BlazeDS and Spring.
In my previous blog posting on Flex used in conjunction with BlazeDS object remoting, I had a very simple Flex MXML file that is reproduced here for convenience:
ComplexObjectRemoteClient.mxml (Flex)
Not much is required to convert the above Flex client source file into an AIR client source file. In fact, I can keep the
ComplexObjectRemotingAirClient.mxml (AIR)
The most significant change was changing of the root element of the Flex source code (
With the AIR source code easily in place thanks to the easy migration of Flex source code to AIR source code, I now move onto creating the AIR XML-based descriptor file. It is shown next (you can name it whatever you like as long as you reference it by the same name in the application packaging step shown later):
AIR-ComplexObjectRemoting.xml
It is important to note the AIR namespace used in this XML descriptor file. It is 1.5 because I am using AIR 1.5 and Flash Player 10. If I had 1.0 instead of 1.5 in that XML and was using AIR 1.5 and Flash Player 10, I might see an error message like that shown in the next screen snapshot.

The screen snapshot shown above states "Initial window content SWF version 10 exceeds namespace version http://ns.adobe.com/air/application/1.0" and provides the clue that either the namespace needs to be changed to 1.5 as shown above or the version of AIR and Flash Player needs to be reduced.
The
If you already have the Flex 3.2 SDK, you automatically have the AIR 1.5 tools you need. In fact, if you look in the
The command-line syntax to compile the AIR source code shown above is thus:
Compiling AIR MXML Source Code into AIR SWF
With the AIR-based SWF generated, it is time to package up the AIR application. However, before doing that we need to generate a security certificate using
Generating a Security Certificate
The important thing to note for now from the command shown above for certificate generation is the name (sampleCertificate.pfx) and the password (dustinWasHere).
With the Flex MXML source code converted easily to AIR MXML source code and then compiled into an AIR SWF, with the AIR XML descriptor file generated, and with the security certificate generated, we are ready to package it all up into an AIR application with a .air extension. That command is shown next:
Packaging the AIR Application
With careful examination of the above command, one can see that
To run the generated AIR application, its name (ComplexObjectRemotingClient.air) can be typed on the command line or the file name can be clicked on in a Window. Two screen snapshots that follow show some of what one sees when running this AIR application for the first time. These snapshots assume previous installation of the AIR runtime.


Assuming that the server-side servlet demonstrated in my earlier Flex blog posting is deployed on GlassFish or other Java EE-compatible web server, the AIR client shown above will go through a cycle that includes the following two screen snapshots.

One final gotcha to mention here in relation to using BlazeDS and transitioning from Flex to AIR is the need to make a minor tweak to the
Conclusion
BlazeDS can be used with AIR and rich desktop applications very similarly to how it is can be used with Flex for rich internet applications. The AIR development model that allows for Flex applications to be easily converted into AIR applications makes it possible for Flex developers to write code that is easily ported between a web browser environment and a desktop environment. Because BlazeDS is useful with both Flex and AIR, Java EE back-ends can provide logic and data to back up rich web applications and rich desktop applications.
Adobe Integrated Runtime (AIR) allows developers to apply their web development skills to desktop development. While AIR applications can be built from a starting point of DHTML/Ajax/JavaScript, I will be transitioning the Flex application demonstrated in my earlier blog posting into an AIR application for this example.
Douglas McCarroll provides informative coverage of a transition of a Flex application using BlazeDS remoting to an AIR application using BlazeDS remoting in his blog entry A Simple AIR / BlazeDS / Remoting Example. My posting here is a little different from his because mine does not rely on FlexBuilder, my example uses the same XML-based, statically configured channels used in the Flex example (McCarroll demonstrates dynamic, ActionScript-based configuration in his example), and I include some screen snapshots in this posting. Two other AIR+BlazeDS blog postings include Connecting an AIR Client with BlazeDS Using Spring/Hibernate and Connecting AIR with BlazeDS and Spring.
In my previous blog posting on Flex used in conjunction with BlazeDS object remoting, I had a very simple Flex MXML file that is reproduced here for convenience:
ComplexObjectRemoteClient.mxml (Flex)
<?xml version="1.0" encoding="UTF-8" ?>
<mx:Application xmlns:mx="http://www.adobe.com/2006/mxml"
width="1100" height="700">
<mx:Script>
import dustin.Person;
/**
* Prepare provided name information and send to server.
*
* @param firstName First name of person.
* @param lastName Last name of person.
*/
public function processAndSubmitName(firstName:String, lastName:String):void
{
const person:Person = new Person(firstName, lastName);
remoteObject.processName(person);
}
</mx:Script>
<!-- Associate client with BlazeDS destination via RemoteObject. -->
<mx:RemoteObject id="remoteObject" destination="HelloWorld" />
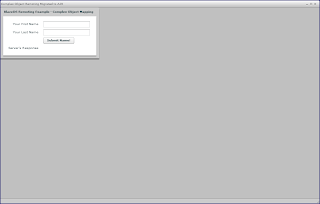
<mx:Panel id="mainPanel" title="BlazeDS Remoting Example - Complex Object Mapping">
<mx:Form>
<mx:FormItem label="Your First Name">
<mx:TextInput id="firstNameInput" />
</mx:FormItem>
<mx:FormItem label="Your Last Name">
<mx:TextInput id="lastNameInput" />
</mx:FormItem>
<mx:FormItem>
<mx:Button label="Submit Name!"
click="processAndSubmitName(firstNameInput.text, lastNameInput.text);" />
</mx:FormItem>
<mx:FormItem label="Server's Response">
<mx:Label text="{remoteObject.processName.lastResult}" />
</mx:FormItem>
</mx:Form>
</mx:Panel>
</mx:Application>
Not much is required to convert the above Flex client source file into an AIR client source file. In fact, I can keep the
.mxml file extension for the AIR application source file and only need to make minor changes to the Flex source file just shown. The adapted source for AIR is shown next.ComplexObjectRemotingAirClient.mxml (AIR)
<?xml version="1.0" encoding="UTF-8" ?>
<mx:WindowedApplication xmlns:mx="http://www.adobe.com/2006/mxml"
                        layout="absolute"
                        title="Complex Object Remoting Migrated to AIR">

   <mx:Script>
   import dustin.Person;

   /**
    * Prepare provided name information and send to server.
    *
    * @param firstName First name of person.
    * @param lastName Last name of person.
    */
   public function processAndSubmitName(firstName:String, lastName:String):void
   {
      const person:Person = new Person(firstName, lastName);
      remoteObject.processName(person);
   }
   </mx:Script>

   <!-- Associate client with BlazeDS destination via RemoteObject. -->
   <mx:RemoteObject id="remoteObject" destination="HelloWorld" />

   <mx:Panel id="mainPanel" title="BlazeDS Remoting Example - Complex Object Mapping">
      <mx:Form>
         <mx:FormItem label="Your First Name">
            <mx:TextInput id="firstNameInput" />
         </mx:FormItem>
         <mx:FormItem label="Your Last Name">
            <mx:TextInput id="lastNameInput" />
         </mx:FormItem>
         <mx:FormItem>
            <mx:Button label="Submit Name!"
                       click="processAndSubmitName(firstNameInput.text, lastNameInput.text);" />
         </mx:FormItem>
         <mx:FormItem label="Server's Response">
            <mx:Label text="{remoteObject.processName.lastResult}" />
         </mx:FormItem>
      </mx:Form>
   </mx:Panel>
</mx:WindowedApplication>
The most significant change was changing of the root element of the Flex source code (
mx:Application) to the root element expected by AIR (mx:WindowedApplication). I also removed the width and height attributes associated with the Flex source code's root tag and replaced them with layout and title tags. The rest of the source file remain unchanged from the Flex version to the AIR version.With the AIR source code easily in place thanks to the easy migration of Flex source code to AIR source code, I now move onto creating the AIR XML-based descriptor file. It is shown next (you can name it whatever you like as long as you reference it by the same name in the application packaging step shown later):
AIR-ComplexObjectRemoting.xml
<?xml version="1.0" encoding="UTF-8"?>
<application xmlns="http://ns.adobe.com/air/application/1.5">
   <id>blog.dustin.ComplexObjectRemoting</id>
   <version>0.01</version>
   <filename>ComplexObjectRemotingAirClient</filename>
   <initialWindow>
      <content>ComplexObjectRemotingAirClient.swf</content>
      <visible>true</visible>
      <systemChrome>none</systemChrome>
      <transparent>true</transparent>
      <width>1100</width>
      <height>700</height>
   </initialWindow>
</application>
It is important to note the AIR namespace used in this XML descriptor file. It is 1.5 because I am using AIR 1.5 and Flash Player 10. If I had 1.0 instead of 1.5 in that XML and was using AIR 1.5 and Flash Player 10, I might see an error message like that shown in the next screen snapshot.

The screen snapshot shown above states "Initial window content SWF version 10 exceeds namespace version http://ns.adobe.com/air/application/1.0" and provides the clue that either the namespace needs to be changed to 1.5 as shown above or the version of AIR and Flash Player needs to be reduced.
The
adt command was used in the screen snapshot above that showed the error message when the AIR XML-based descriptor used a different AIR-related namespace than what was expected by the version of AIR and associated Flash Player. Before we can run the adt command as shown above, however, we must first compile our AIR source code into an SWF.If you already have the Flex 3.2 SDK, you automatically have the AIR 1.5 tools you need. In fact, if you look in the
bin subdirectory of your Flex SDK installation, you will see AIR-specific commands such as adt alongside the Flex command-line options such as mxmlc. The AIR command-line compiler, amxmlc, is located in this same directory. While we could run amxmlc directly, it simply is a call to Flex's mxmlc with the option +configname=air provided to the mxmlc compiler. This is discussed in greater detail in Compiling an AIR Application with the amxmlc Compiler.The command-line syntax to compile the AIR source code shown above is thus:
Compiling AIR MXML Source Code into AIR SWF
mxmlc +configname=air -debug=true -context-root=HelloWorldRemotingServer -services=services-config.xml -output=ComplexObjectRemotingAirClient.swf -- ComplexObjectRemotingAirClient.mxml
With the AIR-based SWF generated, it is time to package up the AIR application. However, before doing that we need to generate a security certificate using
adt as shown next:Generating a Security Certificate
adt –certificate –cn DustinSigned 1024-RSA sampleCertificate.pfx dustinWasHere
The important thing to note for now from the command shown above for certificate generation is the name (sampleCertificate.pfx) and the password (dustinWasHere).
With the Flex MXML source code converted easily to AIR MXML source code and then compiled into an AIR SWF, with the AIR XML descriptor file generated, and with the security certificate generated, we are ready to package it all up into an AIR application with a .air extension. That command is shown next:
Packaging the AIR Application
adt -package -storetype pkcs12 -keystore sampleCertificate.pfx -storepass dustinWasHere ComplexObjectRemotingClient.air AIR-ComplexObjectRemoting.xml ComplexObjectRemotingAirClient.swf
With careful examination of the above command, one can see that
adt -package is the basic command for packaging an AIR application and that it allows for the keystore generated earlier to be specified along with the password set up earlier (dustinWasHere). The name of the generated file that is the AIR application is the name ending with an .air extension and the XML descriptor and SWF file that go into that generated AIR file are listed after the generated file's name in the command.To run the generated AIR application, its name (ComplexObjectRemotingClient.air) can be typed on the command line or the file name can be clicked on in a Window. Two screen snapshots that follow show some of what one sees when running this AIR application for the first time. These snapshots assume previous installation of the AIR runtime.


Assuming that the server-side servlet demonstrated in my earlier Flex blog posting is deployed on GlassFish or other Java EE-compatible web server, the AIR client shown above will go through a cycle that includes the following two screen snapshots.


One final gotcha to mention here in relation to using BlazeDS and transitioning from Flex to AIR is the need to make a minor tweak to the
services-config.xml file used in the AIR client. In the Flex client, we got away with using the token {context.root} and having the Flex mxmlc command replace this token with the value specified with the -services option. I found that with the AIR client I needed to replace this context.root token with the actual context name. The reason for this is documented in the Flex Cookbook Beta under How to Configure the services-config.xml for AIR Application to Communicate with BlazeDS.Conclusion
BlazeDS can be used with AIR and rich desktop applications very similarly to how it is can be used with Flex for rich internet applications. The AIR development model that allows for Flex applications to be easily converted into AIR applications makes it possible for Flex developers to write code that is easily ported between a web browser environment and a desktop environment. Because BlazeDS is useful with both Flex and AIR, Java EE back-ends can provide logic and data to back up rich web applications and rich desktop applications.
Wednesday, January 14, 2009
Must-Have Flex Development Tools Sans FlexBuilder
I previously blogged on the publication of my article JEE and Flex: A Compelling Combination, Part 1 on JavaWorld. As I explained in that blog post, the article focuses primarily on why Java developers might be interested in Flex for RIA development and on communication between Flex and Java EE.
While I made every effort to provide the details needed to follow along with the examples and start working on a Java+Flex application, there was no way I could discuss the many different Flex tools that are useful in daily Flex development in a single article that was really intended to focus more on why Java developers might use Flex and how Java developers can use Flex with Java. I did list some of my favorite resources in the "Resources" section of that article, but I could not cover them all or cover each of them as thoroughly as I would like. In this blog posting, I intend to lay out some of the development tools and resources that I use most often in my Flex development. The goal is to provide a list of highly accessible tools and resources that can help someone new to Flex come up to speed quickly.
I am intentionally not covering one of the most important tools for many Flex developers, FlexBuilder, because it is well covered online and because its license cost means it is less accessible than the freely available tools and resources. However, many people do find its license cost well worth the savings they enjoy by using it. Similarly, I also do not discuss in any greater detail the Flex-related books such Programming Flex 3, ActionScript 3.0 Cookbook, and Flex 3 Cookbook.
Finally, I intend to approach coverage of each useful Flex tool or resource from a Java developer perspective. That being stated, most of these tools and resources are useful to any Flex developer regardless of whether that developer is using Java with Flex.
Flex 3 Language Reference
During years of Java development, I have found the Java API to be one of my most-used resources. Whether it is integrated with my favorite Java IDE or whether I access it online directly, I find myself frequently accessing this resource. Flex has very similar documentation of its classes and core APIs in the Flex 3 Language Reference.
The ASDoc-based layout of this reference is very similar to that of the Javadoc-based API information. The Flex 3 Language Reference has the added benefit of including actual Flash-rendered examples of several of its visual classes and components that match the example source code included with the API information. It is nice to have same code available to look at and play with and even nicer to see its runtime visual appearance and behavior. The Flex 3 Language Reference provides one-stop shopping as an API/class reference, a source of example code on API/class usage, and as a source of examples on the actual Flash deployment of those source examples.
A final advantage of the Flex 3 Language Reference is that it is part of Adobe's LiveDocs approach which allows readers and fellow developers to post comments and corrections to the reference pages. I have found these comments to be helpful more than once.
Flex 3 Component Explorer
As mentioned previously, a really nice feature of the Flex 3 Language Reference is its inclusion of source code and actually rendered examples of many of its components and classes. The Flex 3 Component Explorer similarly includes source code examples and actual rendering of those examples in a Flash Player, but has the advantage of being focused on the Flex 3 Components. This makes it a nice tool for becoming familiar with the components available in Flex. With its focus on components and effects, the Flex 3 Component Explorer is a nice single stop for identifying useful components and effects, for seeing source code examples of how to use those components and effects, and for seeing those components and effects actually rendered in a Flash Player. For the new Flex developer, I cannot think of an easier way to become familiar with the wide set of components and visual effects available with Flex 3.
Programming ActionScript 3.0
Flex consists of both MXML (an XML grammar) and ActionScript (an ECMAScript implementation). While Flex and ActionScript are most often used in conjunction with one another, there are times when one is more appropriate than the other. I have found that many beginning Flex applications can be written largely in MXML, but ActionScript is soon required for certain aspects of the application (especially event handling and business logic). A freely available online resource covering ActionScript is Programming ActionScript 3 (there is also a PDF version).
Flex 3 Help
The Flex 3 Help is particularly useful for introducing oneself to new Flex concepts. It covers everything from basic ActionScript and basic MXML to server communication and use of Flex with AIR applications. The Flex 3 Help includes a link to the Programming ActionScript 3 just referenced and is another instance of an Adobe LiveDocs document that can be commented on by readers.
Flash Player Debugger Version
The Flex developer who does not use the Flash Player Debugger Version during development can be at a serious disadvantage. The special debugger version of the Flash Player allows the Flex developer to use the trace() functionality, to use the command-line debugger (fdb), and to see useful stack trace information when a Flex error is encountered.
I have seen multiple cases online when Flex developers have been frustrated by lack of debug information that would have been available if they had only installed the debugger version of the Flash Player in their development web browser. Awareness of and use of the the Flash Debug Player is one of the most valuable things a Flex developer can use. I think that Ben Simon's makes a good case for the difference between using and not using this tool in his blog posting Like X-Ray Vision for Flex.
Flex IDE Support
Eclipse-based FlexBuilder is obviously a very popular choice for building Flex applications. However, because MXML and ActionScript are both text-based and are based on or very similar to other standardly used syntax (XML and JavaScript), any text editor or XML/JavaScript-supporting IDE can be useful in Flex development.
I have blogged previously about a very simple step one can take with jEdit to add some minor Flex support. Others have also blogged about improvements to jEdit for supporting MXML/ActionScript. Similarly, I have also blogged previously about minor NetBeans configuration to better support MXML development and work has started on FlexBean, a plug-in for NetBeans 6.5 to support Flex development. The IntelliJ IDEA IDE includes Flex support as well.
Besides the text editors and Java IDEs, there are other IDEs that can be very helpful in Flex development. These include Spket IDE that I have blogged about previously and Aptana Studio.
Flex 3 Getting Started
The Flex 3 Getting Started resource is, as its name suggests, a great resource for someone just starting to investigate Flex. It includes links to some of the resources that I have mentioned above. I don't use this particular resource as often as the ones listed above, but I list it here for those who are new to Flex.
Flex 3 Showcase
The Flex 3 Showcase is helpful for multiple reasons. First, it may be just what you need to show to a client or manager to help them see the possibilities of Flex. Second, and perhaps more importantly in the context of this blog posting, these sophisticated Flex-based applications demonstrated in Flex Showcase have their View Source functionality enabled. This means that you can right-click on the applications as they are rendered in the Flash Player and select the option "View Source."
swfobject
Most realistic Flash applications are typically run within an HTML page and Flex-based Flash applications are no different. I have found swfobject to be the most useful tool for embedding the Flex-based .swf files in my HTML pages. I have briefly covered one use of swfobject in my blog posting Communication Between Two Flex Applications.
BlazeDS and the BlazeDS Developer Guide
For the Java developer using Flex rich clients with Java EE back-ends, it is likely that BlazeDS will be of great interest. Like the Flex 3 SDK, BlazeDS is open source and available for free download. The BlazeDS Developer Guide (LiveDocs version and PDF version) is a highly useful resource for learning how to apply BlazeDS's features that include a proxied HTTPService, a proxied WebService, object remoting, and messaging.
Flex Style Explorer
When I blogged about applying CSS styles in Flex, I mentioned the Flex Style Explorer. The Flex Style Explorer does for Flex styling what the previously mentioned Flex Component Explorer does for Flex components. The Flex Style Explorer both demonstrates different aspects of styling in Flex and the Flex-supported CSS code needed to make those styling specifications happen.
Adobe Flash Player 10 Security and Cross-domain Policy File Specification
The Java developer building a Flex client that accesses a remote Java EE server will often encounter the
The
Blogs
There is a wide variety of useful and sometimes very detailed information on using Flex in the blogosphere. I like to peruse DZone for fresh Flex-related resources and also have found Google's BlogSearch (with "flex" as the search term) to also be useful. Perhaps the most useful thing for me, however, has been the simple Google search engine when I needed to look something specific up.
There are some specific Flex-focused blogs that a Flex developer might want to subscribe to or regularly check out. These include the Official Flex Team Blog, Ted on Flex, Flex.org, Christophe Coenraets's Blog, James Ward's Blog, Per Olsen's old and new blogs, Sean the Flex Guy, Farata Systems Blog, and many, many more. One of the many reasons/motivations/incentives that I have for blogging is to make things available for me to easily and conveniently refer to later. Flex is no different and I have even found my own blog postings on Flex to be useful at times.
Support Forums
As with many products and technologies, support forums can also be of great use to both the new Flex developer and the more seasoned Flex developer. These include the Flex Support Forums and more general forums like Stack Overflow.
Conclusion and Additional Resources
There are a seemingly infinite number of other worthy Flex references online. Because I can never hope to even remember all of them let alone discuss all of them, I am again reminded of the usefulness of a powerful search engine in finding what one needs. However, I tried in the list above to discuss some Flex-related tools and resources that I find myself using enough that I do remember them and appreciate them on a near daily basis. It is also not at all surprising that many of the same resources that are useful for Java developers (such as the search engine, forums, and API documentation) are useful to Flex developers.
Finally, I will now list a couple of links to blog postings that are similar to this one in that they contain a collection of links that the respective blog author considered to be highly useful in that author's Flex work. In fact, as I browse through them, I remember other blogs that deserve specific mention, but this post is already getting too long to add all of them.
→ Bookmark: 60+ Adobe Flex Reference Websites (11 January 2009)
→ Flex Tutorials Roundup (14 January 2009)
→ Best Adobe Flex Resources and Tutorial Sites (25 March 2008)
→ List of 31 Flex APIs, Libraries, Components, and Tools (21 August 2007)
→ 22 ActionScript 3.0 APIs (13 August 2007)
→ Flex: The Unix Geek's Ideal Flash Environment (18 September 2008)
→ What Non-Flex Resources Have Helped You Learn Flex? (30 July 2008)
UPDATE (16 January 2009): The links below this line have been added since the original post and are based on feedback comments.
→ Tour de Flex
→ 104 Free Opensource APIs, Libraries, and tools for the Flash Platform (5 January 2009)
UPDATE (17 January 2009): The reference added next (the ActionScript Reference) is useful for identifying ActionScript classes and APIs that apply to Flex 3.2, AIR 1.5, or both on the Flash Player 10.
→ Adobe Flash Platform ActionScript Reference Rich Internet Application Development
While I made every effort to provide the details needed to follow along with the examples and start working on a Java+Flex application, there was no way I could discuss the many different Flex tools that are useful in daily Flex development in a single article that was really intended to focus more on why Java developers might use Flex and how Java developers can use Flex with Java. I did list some of my favorite resources in the "Resources" section of that article, but I could not cover them all or cover each of them as thoroughly as I would like. In this blog posting, I intend to lay out some of the development tools and resources that I use most often in my Flex development. The goal is to provide a list of highly accessible tools and resources that can help someone new to Flex come up to speed quickly.
I am intentionally not covering one of the most important tools for many Flex developers, FlexBuilder, because it is well covered online and because its license cost means it is less accessible than the freely available tools and resources. However, many people do find its license cost well worth the savings they enjoy by using it. Similarly, I also do not discuss in any greater detail the Flex-related books such Programming Flex 3, ActionScript 3.0 Cookbook, and Flex 3 Cookbook.
Finally, I intend to approach coverage of each useful Flex tool or resource from a Java developer perspective. That being stated, most of these tools and resources are useful to any Flex developer regardless of whether that developer is using Java with Flex.
Flex 3 Language Reference
During years of Java development, I have found the Java API to be one of my most-used resources. Whether it is integrated with my favorite Java IDE or whether I access it online directly, I find myself frequently accessing this resource. Flex has very similar documentation of its classes and core APIs in the Flex 3 Language Reference.
The ASDoc-based layout of this reference is very similar to that of the Javadoc-based API information. The Flex 3 Language Reference has the added benefit of including actual Flash-rendered examples of several of its visual classes and components that match the example source code included with the API information. It is nice to have same code available to look at and play with and even nicer to see its runtime visual appearance and behavior. The Flex 3 Language Reference provides one-stop shopping as an API/class reference, a source of example code on API/class usage, and as a source of examples on the actual Flash deployment of those source examples.
A final advantage of the Flex 3 Language Reference is that it is part of Adobe's LiveDocs approach which allows readers and fellow developers to post comments and corrections to the reference pages. I have found these comments to be helpful more than once.
Flex 3 Component Explorer
As mentioned previously, a really nice feature of the Flex 3 Language Reference is its inclusion of source code and actually rendered examples of many of its components and classes. The Flex 3 Component Explorer similarly includes source code examples and actual rendering of those examples in a Flash Player, but has the advantage of being focused on the Flex 3 Components. This makes it a nice tool for becoming familiar with the components available in Flex. With its focus on components and effects, the Flex 3 Component Explorer is a nice single stop for identifying useful components and effects, for seeing source code examples of how to use those components and effects, and for seeing those components and effects actually rendered in a Flash Player. For the new Flex developer, I cannot think of an easier way to become familiar with the wide set of components and visual effects available with Flex 3.
Programming ActionScript 3.0
Flex consists of both MXML (an XML grammar) and ActionScript (an ECMAScript implementation). While Flex and ActionScript are most often used in conjunction with one another, there are times when one is more appropriate than the other. I have found that many beginning Flex applications can be written largely in MXML, but ActionScript is soon required for certain aspects of the application (especially event handling and business logic). A freely available online resource covering ActionScript is Programming ActionScript 3 (there is also a PDF version).
Flex 3 Help
The Flex 3 Help is particularly useful for introducing oneself to new Flex concepts. It covers everything from basic ActionScript and basic MXML to server communication and use of Flex with AIR applications. The Flex 3 Help includes a link to the Programming ActionScript 3 just referenced and is another instance of an Adobe LiveDocs document that can be commented on by readers.
Flash Player Debugger Version
The Flex developer who does not use the Flash Player Debugger Version during development can be at a serious disadvantage. The special debugger version of the Flash Player allows the Flex developer to use the trace() functionality, to use the command-line debugger (fdb), and to see useful stack trace information when a Flex error is encountered.
I have seen multiple cases online when Flex developers have been frustrated by lack of debug information that would have been available if they had only installed the debugger version of the Flash Player in their development web browser. Awareness of and use of the the Flash Debug Player is one of the most valuable things a Flex developer can use. I think that Ben Simon's makes a good case for the difference between using and not using this tool in his blog posting Like X-Ray Vision for Flex.
Flex IDE Support
Eclipse-based FlexBuilder is obviously a very popular choice for building Flex applications. However, because MXML and ActionScript are both text-based and are based on or very similar to other standardly used syntax (XML and JavaScript), any text editor or XML/JavaScript-supporting IDE can be useful in Flex development.
I have blogged previously about a very simple step one can take with jEdit to add some minor Flex support. Others have also blogged about improvements to jEdit for supporting MXML/ActionScript. Similarly, I have also blogged previously about minor NetBeans configuration to better support MXML development and work has started on FlexBean, a plug-in for NetBeans 6.5 to support Flex development. The IntelliJ IDEA IDE includes Flex support as well.
Besides the text editors and Java IDEs, there are other IDEs that can be very helpful in Flex development. These include Spket IDE that I have blogged about previously and Aptana Studio.
Flex 3 Getting Started
The Flex 3 Getting Started resource is, as its name suggests, a great resource for someone just starting to investigate Flex. It includes links to some of the resources that I have mentioned above. I don't use this particular resource as often as the ones listed above, but I list it here for those who are new to Flex.
Flex 3 Showcase
The Flex 3 Showcase is helpful for multiple reasons. First, it may be just what you need to show to a client or manager to help them see the possibilities of Flex. Second, and perhaps more importantly in the context of this blog posting, these sophisticated Flex-based applications demonstrated in Flex Showcase have their View Source functionality enabled. This means that you can right-click on the applications as they are rendered in the Flash Player and select the option "View Source."
swfobject
Most realistic Flash applications are typically run within an HTML page and Flex-based Flash applications are no different. I have found swfobject to be the most useful tool for embedding the Flex-based .swf files in my HTML pages. I have briefly covered one use of swfobject in my blog posting Communication Between Two Flex Applications.
BlazeDS and the BlazeDS Developer Guide
For the Java developer using Flex rich clients with Java EE back-ends, it is likely that BlazeDS will be of great interest. Like the Flex 3 SDK, BlazeDS is open source and available for free download. The BlazeDS Developer Guide (LiveDocs version and PDF version) is a highly useful resource for learning how to apply BlazeDS's features that include a proxied HTTPService, a proxied WebService, object remoting, and messaging.
Flex Style Explorer
When I blogged about applying CSS styles in Flex, I mentioned the Flex Style Explorer. The Flex Style Explorer does for Flex styling what the previously mentioned Flex Component Explorer does for Flex components. The Flex Style Explorer both demonstrates different aspects of styling in Flex and the Flex-supported CSS code needed to make those styling specifications happen.
Adobe Flash Player 10 Security and Cross-domain Policy File Specification
The Java developer building a Flex client that accesses a remote Java EE server will often encounter the
crossdomain.xml file. The Cross-domain Policy File Specification contains valuable insight into how this file works and why it is needed. While I did blog on the crossdomain file previously, that blog posting is already somewhat dated, so it is nice to have a document like this with more up-to-date information. I briefly covered the crossdomain.xml file in the context of using non-proxied HTTPService in the first part of the JavaWorld article and intend to cover it in greater detail related to use of WebService in the forthcoming second part of that article.The
crossdomain.xml file is part of the overall Flash Player security mechanisms. Because Flash is the deployment environment for Flex applications, it is helpful to understand how Flash works, especially in terms of security. Therefore, the Adobe Flash Player 10 Security white paper can be very useful.Blogs
There is a wide variety of useful and sometimes very detailed information on using Flex in the blogosphere. I like to peruse DZone for fresh Flex-related resources and also have found Google's BlogSearch (with "flex" as the search term) to also be useful. Perhaps the most useful thing for me, however, has been the simple Google search engine when I needed to look something specific up.
There are some specific Flex-focused blogs that a Flex developer might want to subscribe to or regularly check out. These include the Official Flex Team Blog, Ted on Flex, Flex.org, Christophe Coenraets's Blog, James Ward's Blog, Per Olsen's old and new blogs, Sean the Flex Guy, Farata Systems Blog, and many, many more. One of the many reasons/motivations/incentives that I have for blogging is to make things available for me to easily and conveniently refer to later. Flex is no different and I have even found my own blog postings on Flex to be useful at times.
Support Forums
As with many products and technologies, support forums can also be of great use to both the new Flex developer and the more seasoned Flex developer. These include the Flex Support Forums and more general forums like Stack Overflow.
Conclusion and Additional Resources
There are a seemingly infinite number of other worthy Flex references online. Because I can never hope to even remember all of them let alone discuss all of them, I am again reminded of the usefulness of a powerful search engine in finding what one needs. However, I tried in the list above to discuss some Flex-related tools and resources that I find myself using enough that I do remember them and appreciate them on a near daily basis. It is also not at all surprising that many of the same resources that are useful for Java developers (such as the search engine, forums, and API documentation) are useful to Flex developers.
Finally, I will now list a couple of links to blog postings that are similar to this one in that they contain a collection of links that the respective blog author considered to be highly useful in that author's Flex work. In fact, as I browse through them, I remember other blogs that deserve specific mention, but this post is already getting too long to add all of them.
→ Bookmark: 60+ Adobe Flex Reference Websites (11 January 2009)
→ Flex Tutorials Roundup (14 January 2009)
→ Best Adobe Flex Resources and Tutorial Sites (25 March 2008)
→ List of 31 Flex APIs, Libraries, Components, and Tools (21 August 2007)
→ 22 ActionScript 3.0 APIs (13 August 2007)
→ Flex: The Unix Geek's Ideal Flash Environment (18 September 2008)
→ What Non-Flex Resources Have Helped You Learn Flex? (30 July 2008)
UPDATE (16 January 2009): The links below this line have been added since the original post and are based on feedback comments.
→ Tour de Flex
→ 104 Free Opensource APIs, Libraries, and tools for the Flash Platform (5 January 2009)
UPDATE (17 January 2009): The reference added next (the ActionScript Reference) is useful for identifying ActionScript classes and APIs that apply to Flex 3.2, AIR 1.5, or both on the Flash Player 10.
→ Adobe Flash Platform ActionScript Reference Rich Internet Application Development
Tuesday, January 13, 2009
Java EE and Flex: A Compelling Combination
My article Java EE and Flex: A Compelling Combination, Part 1 was published on JavaWorld today. I have presented on Java EE+Flex at Collaborate08 and at the Colorado Software Summit, but it was nice to be able to use an article to provide a little different focus on the compelling combination that Java EE and Flex make.
In the article, I introduce Flex features, concepts, and syntax while building a Flex application that gets its data from a Java EE server. The article articulates several general advantages of Flex in addition to advantages of Flex that are specific to Java developers.
The very simple Flex-based example built up in this article provides opportunities to look at several Flex features including some ActionScript 3.0 syntax, custom component creation, styling with CSS, and use of several built-in Flex components.
The article focuses on moving the example from a completely static application with highly redundant code to a leaner application supporting dynamic data population from a Java-based server and dynamic user interaction. The mechanism used in this article for communicating with the Java back-end is Flex's built-in HTTPService. I intentionally used the non-proxied HTTPService provided with the Flex SDK rather than BlazeDS's proxied HTTPService in this first part. In the second part, I will be introducing BlazeDS to the sample application.
I did not cover GraniteDS in this first part and will not be covering it in any detail in the second part. However, for a nice introduction to Flex+Java with GraniteDS, see Franck Wolff's Migrating Java EE Web Applications to Adobe Flex and Granite Data Services.
Thursday, January 1, 2009
Bare Bones BlazeDS Object Remoting
In this blog posting, I will demonstrate using BlazeDS for object remoting between a Flex client and a Java EE-based server. There are several good blog postings and articles on BlazeDS remoting out there already (see Additional Resources section below), but most of them either don't provide a complete example or apply FlexBuilder for some of the "magic." In this post, I will not use FlexBuilder and any IDE or text editor can be used. This allows one to see all the underlying details directly.
Tools Used in these Examples
For the examples in this blog posting, I will be using the following tools:
The following screen snapshot demonstrates the versions of these tools used as described above.

Setting Up BlazeDS for the Application
I won't go into any greater detail regarding installation of the Flex SDK, of the Java SDK, of a Java EE-compliant web server, of Ant, or of an IDE or text editor than that provided above. However, I will briefly look a little closer at installation of BlazeDS.
BlazeDS is open source and its source can be downloaded here, but the source code for BlazeDS is not needed for any of the examples in this blog posting.
The BlazeDS download page includes release builds and nightly builds. I am using a release build for the examples here. BlazeDS 3.2 Release Build 3978 is available as of this writing and I am using BlazeDS 3.2 Release Build 3978 for these examples.
An advantage of using the Turnkey download is that Tomcat web server is included with it. However, I intentionally want the examples in this posting to be "bare bones" and so will use a separate JEE implementation. With the non-Turnkey binary BlazeDS release downloaded (it will be called something like

With access to the
The next screen snapshot shows the contents of the

For my examples, I will be expanding the


As the immediately preceding image shows, the expanded
Tailoring BlazeDS Web Descriptor Configuration for Custom Application
Up until now, we've merely unzipped the downloaded binary BlazeDS file and then expanded the
One of the first things I like to do when customizing my own BlazeDS-based application based on the provided
The less important changes that I make to the provided

The new and customized
New and Customized web.xml File
Customizing Other BlazeDS Configuration Files
Besides the
The first file we'll look at is called
I use the same approach with
templates/services-config-template.xml
The code for the template version of
I left the reference in
remoting-config.xml
The above
Whew! That wraps up the BlazeDS configuration modifications. If you have not looked into this before, it looks worse than it really is. Most of the final content shown in the code listings above was already provided by the
The Java Class
The contents of the
HelloWorldRemotingServer.java (1st Version)
The important thing to note from the code listing for the Java class immediately above is that it is a regular Java class with no knowledge of Flex or ActionScript.
The Flex Client (Hello World Client)
The Java class we just looked at returns a provided String surrounded with a Hello World prefix and exclamation point. We'll now look at the Flex MXML code that can be used to invoke this Java object and this
HelloWorldRemotingClient.mxml
The MXML code above is very simple. The RemoteObject element (with an 'id' of "remoteObject") specifies a destination (via the 'destination' attribute) of "HelloWorld" (defined above in the
If you plan to use the
Building it All
Even though I still need to show another Flex client, an ActionScript class, and another Java class whose instantiation is bound to the ActionScript class's instantiation, I am including the entire Ant
build.xml (Ant)
In the above
Targets of specific interest in the above
When I build the WAR and the client SWF file (same name as its source MXML file but with an .swf extension rather than the .mxml extension), I can then deploy the WAR and run the SWF client. The deployment of the WAR file is done with whatever mechanism your web serve provides. The SWF client can easily be executed by clicking on it or typing its full name on the command line. The following two screen snapshots show the client running by first showing how it initially appears and then showing how it appears once a name has been entered into the name field.


Binding Java to ActionScript
The above example demonstrates the ability to remotely call Java on the server from MXML on the client via the RemoteObject and BlazeDS. However, the example up to this point has only used simple mappings (in this case Strings). It is more interesting to now move onto an example of binding a more complex objects. The good news is that it is all still pretty easy.
For this slightly more complex example, we will expand the
HelloWorldRemotingServer.java (Finished Version)
One of the newly added methods is called
Person.java
There is nothing remarkable about the
For Strings, primitives, and object/boxed versions of primitives, BlazeDS can typically map these types to appropriate ActionScript types. Now that we've introduced the
Person.as
Arguably the most interesting point about the ActionScript version of
The ActionScript
I want to make one final observation regarding the
A New Flex Client (Complex Object Client)
The code for
ComplexObjectRemotingClient.mxml
The new Flex client uses a little ActionScript to prepare the call to the server and instantiates one of our newly written
The following two screen snapshots show the initial and final state of the new client when it is executed as the Hello World client was earlier.
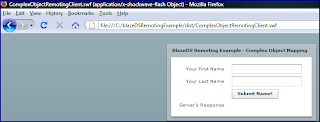

As the above output shows, the method accepting a Person object (note the exclamation point in the returned message) has been contacted on the Java side from a remote Flex client.
Pictorial Overview of Directory/File Structure
One of the things that can be a little tricky about using BlazeDS or the mxmlc compiler if you have very little experience using them is the placement of files. Fortunately, most of this was already setup correctly by the

The image above shows where to place MXML source files, ActionScript source files, and Java source files for the
Conclusion
This has turned out to be a rather lengthy blog entry. However, this is to be expected considering that I've intentionally tried to make this a complete and thorough introduction to BlazeDS/Java remoting and because I have included the code directly within the blog posting rather than as a separate attachment. Also, I've tried to avoid use of anything specific to FlexBuilder so that anyone with any text editor should be able to use my examples.
Despite the length of this blog entry, use of the BlazeDS remoting is pretty straightforward once you have tried it a couple times. It does get more complex when security constraints and other details are added back in, but one can choose how much one implements at each step and the examples above are nice for confirming that client-to-server communication is working properly.
Additional Resources
Tools Used in these Examples
For the examples in this blog posting, I will be using the following tools:
- BlazeDS - I am using BlazeDS 3.2 and I am using the binary distribution (not Turnkey that includes Tomcat) to be more "bare bones."
- Flex 3 SDK - I am using Flex 3.2. For convenience, I have set an environment variable
FLEX_HOMEto point to the main directory of my Flex 3 installation (where I unzipped it) and I have included%FLEX_HOME%\bin (or$FLEX_HOME/bin) on myPATH. - Java SE SDK - I am using Java SE 6 Update 10, but a newer or older version of Java SE should be fine as long as you are using at least J2SE 5.
- Java EE web implementation - The BlazeDS Turnkey includes Tomcat, but I am using GlassFish for my examples. In theory, it should not matter which Java EE-compliant web server you use.
- Ant (optional) - I provide a
build.xmlAnt build file in this posting that will build the Flex clients and will build the BlazeDS/JEE-powered server. However, these operations can be done individually as well. While I build a WAR file with my Ant build for the server-side deployment, one could simply edit directories and files in one's favorite server's deployment directory for the same effect. Similarly, one could build the Flex clients individually on the command line with the mxmlc command rather than using thebuild.xmlfile to do this. I am using Ant 1.7, but I am not aware of any features I am using specific to that version. Finally, I have myANT_HOMEenvironment variable set to my installation of Ant and have%ANT_HOME%/binin my path for convenience in building. - Text Editor or IDE - You could use FlexBuilder, but do not need to for the examples in this posting. Other choices include NetBeans, Eclipse, JDeveloper, IDEA, JEdit, SpketIDE, vim, emacs, and even Notepad/Wordpad. If you do choose to use an IDE that supports XML, you can make things a little easier for yourself by associating MXML with XML as I demonstrate with NetBeans here and with JEdit here. Also, there are plug-ins for Flex for IDEs such as FlexBean for NetBeans. Also, it is my understanding that IDEA has built-in Flex support.
The following screen snapshot demonstrates the versions of these tools used as described above.

Setting Up BlazeDS for the Application
I won't go into any greater detail regarding installation of the Flex SDK, of the Java SDK, of a Java EE-compliant web server, of Ant, or of an IDE or text editor than that provided above. However, I will briefly look a little closer at installation of BlazeDS.
BlazeDS is open source and its source can be downloaded here, but the source code for BlazeDS is not needed for any of the examples in this blog posting.
The BlazeDS download page includes release builds and nightly builds. I am using a release build for the examples here. BlazeDS 3.2 Release Build 3978 is available as of this writing and I am using BlazeDS 3.2 Release Build 3978 for these examples.
An advantage of using the Turnkey download is that Tomcat web server is included with it. However, I intentionally want the examples in this posting to be "bare bones" and so will use a separate JEE implementation. With the non-Turnkey binary BlazeDS release downloaded (it will be called something like
blazeds-bin-3.2.0.3978.zip), "installation" simply involves unzipping the ZIP file and extracting the WAR file (blazeds.war) from it. The next screen snapshot shows the contents of this binary BlazeDS download, including the WAR file just mentioned.
With access to the
blazeds.war file, we now need to expand the blazeds.war's contents. We have two choices here. One popular choice is to expand this WAR file's contents in a web server's deployment directory. Many web servers will then automatically deploy the contents of that expanded directory. However, I will be taking the second approach here and will rebuild the WAR file for deployment with an Ant script. This provides greater portability between web servers and allows me to show better what needs to be included in the server-side BlazeDS-powered WAR file via the build.xml file. You should be able to use the direct deployment of expanded directory approach and not need Ant for the server-side if you prefer that approach.The next screen snapshot shows the contents of the
blazeds.war file that needs to be expanded.
For my examples, I will be expanding the
blazeds.war file's contents into the C:\blazeDSRemotingExample) directory. I typically remove the META-INF directory and its contents from the expanded directory, so that it looks something like that shown in the next two screen snapshots. Note that the red lines through directories in the first screen snapshot are intentional because the entries that they cross out will eventually be built up, but will not be there when blazeds.war is initially expanded (in other words, your newly expanded directory should only have the WEB-INF directory if you deleted the META-INF directory as I did).

As the immediately preceding image shows, the expanded
blazeds.war contents include some expected subdirectories beneath WEB-INF including classes and lib. Because we will rebuild our server's WAR file with this same expanded directory structure, we already have the necessary directories we need for the web application's classpath.Tailoring BlazeDS Web Descriptor Configuration for Custom Application
Up until now, we've merely unzipped the downloaded binary BlazeDS file and then expanded the
blazeds.war file into a directory. Now it is time to begin tweaking the configuration files included with the blazeds.war file to accommodate our application.One of the first things I like to do when customizing my own BlazeDS-based application based on the provided
blazeds.war file is to upgrade the web application descriptor file (web.xml) to reflect Servlet 2.5 rather than Servlet 2.3. I provide more detail on this process in my blog entry on OpenLaszlo with Java Servlets 2.5 (OpenLaszlo also provides an older web.xml file). The most important changes to note are that the DTD-described file becomes W3C XML Schema described instead, the version attribute is obviously updated from 2.3 to 2.5, and the <display-name> element is removed as a nested element under the <servlet> element. This particular change of versions of the web.xml file is probably not absolutely necessary in this case because I'm not using Java EE 5 annotations, but I make the change every time anyway.The less important changes that I make to the provided
web.xml file include removal of commented out section specifically intended for WebSphere (which I'm not using here) and other comments. The other change I make is to change the text for the high-level <display-name> and <description> elements. Indeed, when I have completed the transformation, the new web.xml file still looks very similar to the one provided with the blazeds.war file. Several of these changes are depicted in the next screen snapshot taken of a diff run against the two versions of web.xml using the ExamDiff tool.
The new and customized
web.xml file is shown next.New and Customized web.xml File
<?xml version="1.0" encoding="UTF-8"?>
<web-app xmlns:xsi="http://www.w3.org/2001/XMLSchema-instance"
         xsi:schemaLocation="http://java.sun.com/xml/ns/javaee http://java.sun.com/xml/ns/javaee/web-app_2_5.xsd"
         version="2.5" xmlns="http://java.sun.com/xml/ns/javaee">
    <display-name>Dustin's BlazeDS Hello World Example</display-name>
    <description>An extremely simple BlazeDS Remoting Application</description>

    <!-- Http Flex Session attribute and binding listener support -->
    <listener>
        <listener-class>flex.messaging.HttpFlexSession</listener-class>
    </listener>

    <!-- MessageBroker Servlet -->
    <servlet>
        <servlet-name>MessageBrokerServlet</servlet-name>
        <servlet-class>flex.messaging.MessageBrokerServlet</servlet-class>
        <init-param>
            <param-name>services.configuration.file</param-name>
            <param-value>/WEB-INF/flex/services-config.xml</param-value>
       </init-param>
        <load-on-startup>1</load-on-startup>
    </servlet>

    <servlet-mapping>
        <servlet-name>MessageBrokerServlet</servlet-name>
        <url-pattern>/messagebroker/*</url-pattern>
    </servlet-mapping>

    <welcome-file-list>
        <welcome-file>index.html</welcome-file>
        <welcome-file>index.htm</welcome-file>
    </welcome-file-list>

</web-app>
Customizing Other BlazeDS Configuration Files
Besides the
classes and lib subdirectories contained under WEB-INF in the directory expanded from the blazeds.war file, we also have subdirectories called src and flex. We will not customize a couple XML files inside the flex directory to tailor BlazeDS for our application's use.The first file we'll look at is called
services-config.xml. This file is central to all BlazeDS-based applications whether they are based on RPC or messaging. In fact, among other things, this file usually imports additional configuration files for things that are specific to proxying, to remoting, and to messaging.I use the same approach with
services-config.xml that I used with web.xml: I adapt the version provided by blazeds.war to work for the custom application. However, there is a twist in this one case. I want to have a slightly different version of this file for my Flex client than I have for my WAR that gets deployed on the server. Keeping the DRY principle in mind, my approach here is to create a services-config-template.xml file and use Ant's text substitution functionality to automatically generate the services-config.xml file to be used by both the Flex client and by the WAR that is deployed to the server. The next code listing shows the template file, which I placed in a newly created directory creatively called "templates".templates/services-config-template.xml
<?xml version="1.0" encoding="UTF-8"?>
<services-config>

    <services>
        <service-include file-path="remoting-config.xml" />
        <service-include file-path="proxy-config.xml" />
        <service-include file-path="messaging-config.xml" />
    </services>

    <security>
        <login-command class="flex.messaging.security.TomcatLoginCommand" server="Tomcat"/>
    </security>

    <channels>
        <channel-definition id="my-amf" class="mx.messaging.channels.AMFChannel">
            <endpoint url="http://@host@:@port@/{context.root}/messagebroker/amf"
                      class="flex.messaging.endpoints.AMFEndpoint"/>
        </channel-definition>
        <channel-definition id="my-secure-amf" class="mx.messaging.channels.SecureAMFChannel">
            <endpoint url="https://@host@:@port@/{context.root}/messagebroker/amfsecure"
                      class="flex.messaging.endpoints.SecureAMFEndpoint"/>
            <properties>
                <add-no-cache-headers>false</add-no-cache-headers>
            </properties>
        </channel-definition>

        <channel-definition id="my-polling-amf" class="mx.messaging.channels.AMFChannel">
            <endpoint url="http://@host@:@port@/{context.root}/messagebroker/amfpolling" class="flex.messaging.endpoints.AMFEndpoint"/>
            <properties>
                <polling-enabled>true</polling-enabled>
                <polling-interval-seconds>4</polling-interval-seconds>
            </properties>
        </channel-definition>
    </channels>

    <logging>
        <target class="flex.messaging.log.ConsoleTarget" level="Error">
            <properties>
                <prefix>[BlazeDS] </prefix>
                <includeDate>false</includeDate>
                <includeTime>false</includeTime>
                <includeLevel>false</includeLevel>
                <includeCategory>false</includeCategory>
            </properties>
            <filters>
                <pattern>Endpoint.*</pattern>
                <pattern>Service.*</pattern>
                <pattern>Configuration</pattern>
            </filters>
        </target>
    </logging>

    <system>
        <redeploy>
            <enabled>false</enabled>
        </redeploy>
    </system>

</services-config>
The code for the template version of
services-config-template.xml shown immediately above includes Ant token markers (@host@ and @port@) that will be replaced by Ant with an actual host name and a port number for the client's version of services-config.xml). These same tokens will be replaced with BlazeDS-recognized tokens {server.name} and {server.port} for the server-side version of services-config.xml. Note that I was able to leave the BlazeDS template {context.root} in the template for the client-side version of services-config.xml because the mxmlc compiler allows me to specify its value for the client as an option.I left the reference in
services-config.xml to all three previously referenced files (remoting-config.xml, proxy-config.xml, and messaging-config.xml), but really only need the reference to remoting-config.xml for this blog post examples. As with the web.xml file, my approach to creation of that referenced remoting-config.xml file is to simply adapt the one provided with the expanded blazeds.war file. The only necessary change is to specify the Java classes that will be used on the server side. We haven't looked at this Java class yet, but the remoting-config.xml file shown in the next code listing tips us off that it will be a class named HelloWorldRemotingServer in a package named dustin.remoting-config.xml
<?xml version="1.0" encoding="UTF-8"?>
<service id="remoting-service"
         class="flex.messaging.services.RemotingService">

    <adapters>
        <adapter-definition id="java-object" class="flex.messaging.services.remoting.adapters.JavaAdapter" default="true"/>
    </adapters>

    <default-channels>
        <channel ref="my-amf"/>
    </default-channels>

   <destination id="HelloWorld">
      <properties>
         <source>dustin.HelloWorldRemotingServer</source>
      </properties>
   </destination>
</service>
The above
remoting-config.xml file specifies that the destination associated with this Java class on the server side can be referenced as "HelloWorld" (the 'id' attribute of the destination element).Whew! That wraps up the BlazeDS configuration modifications. If you have not looked into this before, it looks worse than it really is. Most of the final content shown in the code listings above was already provided by the
blazeds.war that we expanded. I only made some relatively small modifications to the web.xml and remoting-config.xml files. The services-config.xml file likewise only required some minor changes, but the more significant issue there was that I needed to prepare a different version of this file for the client than for the server. The server version of services-config.xml can resolve the BlazeDS tokens {host.name} and {host.port} based on the web server settings, but I specify a hard-coded host name and port for the client version of services-config.xml.The Java Class
The contents of the
remoting-config.xml file provided us with a sneak peek at some details about the Java class on the server. The definition of this simple Java class is shown next. Note that this file is placed in a subdirectory called dustin (because it is in the "dustin" Java package) under the src subdirectory under WEB-INF in our expanded directory.HelloWorldRemotingServer.java (1st Version)
package dustin;

/**
 * Simple "Hello World" example meant for use in BlazeDS remoting example.
 * This is the server-side POJO that will be exposed to a Flex client via
 * BlazeDS remoting.
 *
 * @author Dustin
 */
public class HelloWorldRemotingServer
{
   /** No-arguments constructor. */
   public HelloWorldRemotingServer() {}

   /**
    * Accept a String representing a name and return that name as part of a
    * Hello message.
    *
    * @param nameToSayHelloTo Name to which Hello will be addressed.
    * @return Hello address to provided name.
    */
   public String processHello(final String nameToSayHelloTo)
   {
      return "Hello, " + nameToSayHelloTo + "!";
   }
}
The important thing to note from the code listing for the Java class immediately above is that it is a regular Java class with no knowledge of Flex or ActionScript.
The Flex Client (Hello World Client)
The Java class we just looked at returns a provided String surrounded with a Hello World prefix and exclamation point. We'll now look at the Flex MXML code that can be used to invoke this Java object and this
processHello(String) method via BlazeDS.HelloWorldRemotingClient.mxml
<?xml version="1.0" encoding="UTF-8" ?>
<mx:Application xmlns:mx="http://www.adobe.com/2006/mxml"
                width="1100" height="700">

   <!-- Associate client with BlazeDS destination via RemoteObject. -->
   <mx:RemoteObject id="remoteObject" destination="HelloWorld" />

   <mx:Panel id="mainPanel" title="Simple BlazeDS Remoting Example - Hello World">
      <mx:Form>
         <mx:FormItem label="Provide Your Name">
            <mx:TextInput id="textInput"
                          change="remoteObject.processHello(textInput.text)"/>
         </mx:FormItem>
         <mx:FormItem label="Server's Response">
            <mx:Label text="{remoteObject.processHello.lastResult}"/>
         </mx:FormItem>
      </mx:Form>
   </mx:Panel>
</mx:Application>
The MXML code above is very simple. The RemoteObject element (with an 'id' of "remoteObject") specifies a destination (via the 'destination' attribute) of "HelloWorld" (defined above in the
remoting-config.xml file).If you plan to use the
build.xml file provided in this blog posting, this MXML file should be placed at parallel to the WEB-INF directory (as opposed to in the WEB-INF directory like the Java class and configuration files previously discussed).Building it All
Even though I still need to show another Flex client, an ActionScript class, and another Java class whose instantiation is bound to the ActionScript class's instantiation, I am including the entire Ant
build.xml file here for convenience. Some of the targets defined in this file will not work until the remaining classes discussed later in this blog posting are included.build.xml (Ant)
<?xml version="1.0" encoding="UTF-8"?>
<project name="HelloWorldBlazeDSRemotingExample" default="all" basedir=".">
   <description>Builds, tests, and runs the Dustin's Hello World BlazeDS Remoting Example.</description>

   <!-- NOTE TO USERS: At least three properties set below may need to be
                       set for this build file to work with different deployment
                       environments.  The three minimum properties to examine
                       are client.host, client.port, and app.dir.
   -->

   <!-- GENERAL PROPERTIES -->
   <!--
        *********************************************************************
        Change server's host name and port (determined by web server
        deployment of server side of code).
        *********************************************************************
   -->
   <property name="client.host" value="localhost" />
   <property name="client.port" value="8080" />
   <!--
        *********************************************************************
        Change definition of app.dir if necessary (to where blazeds.war
               has been uncompressed).
        *********************************************************************
   -->
   <property name="app.dir" value="C:\\blazeDSRemotingExample" />
   <property name="web.inf.dir" value="${app.dir}/WEB-INF" />
   <property name="templates.dir" value="${app.dir}/templates" />
   <property name="context.name" value="HelloWorldRemotingServer" />


   <!-- GENERAL JAVA PORTION PROPERTIES -->
   <property name="src.dir" value="${web.inf.dir}/src" />
   <property name="classes.dir" value="${web.inf.dir}/classes" />
   <property name="lib.dir" value="lib" />
   <property name="dist.dir" value="${app.dir}/dist" />
   <property name="javadoc.dir" value="${dist.dir}/javadoc" />
   <property name="serverside.war" value="${context.name}.war" />

   <!-- Nothing special needed for classpath! -->
   <path id="classpath" />


   <!-- BLAZEDS RELATED PROPERTIES -->
   <property name="services.config.server.name"
             value="services-config.xml" />
   <property name="services.config.client.name"
             value="services-config-client.xml" />
   <property name="services.config.template"
             value="services-config-template.xml" />


   <!-- GENERAL FLEX PORTION PROPERTIES (FLEX CLIENT) -->
   <property name="app.flex.dir" value="${web.inf.dir}/flex" />
   <property name="flex.debug" value="true" />
   <property name="flex.warnings" value="true" />
   <property name="flex.context.root" value="${context.name}" />
   <property name="flex.services"
             value="${app.flex.dir}/${services.config.client.name}" />
   <property name="flex.source.path" value="${web.inf.dir}" />
   <property name="flex.publisher" value="Dustin" />
   <property name="flex.title"
             value="'Hello World BlazeDS Remoting Example'" />
   <property name="flex.description"
             value="'Simple client for BlazeDS Remoting example'" />
   <property name="flex.verbose.stacktraces" value="true" />
   <property name="flex.actionscript.warnings" value="true" />
   <property name="flex.app.helloworld.name.root"
             value="HelloWorldRemotingClient" />
   <property name="flex.app.helloworld.name.source"
             value="${flex.app.helloworld.name.root}.mxml" />
   <property name="flex.app.helloworld.name.swf"
             value="${flex.app.helloworld.name.root}.swf" />
   <property name="flex.app.complexobject.name.root"
             value="ComplexObjectRemotingClient" />
   <property name="flex.app.complexobject.name.source"
             value="${flex.app.complexobject.name.root}.mxml" />
   <property name="flex.app.complexobject.name.swf"
             value="${flex.app.complexobject.name.root}.swf" />


   <target name="-init">
      <mkdir dir="${dist.dir}" />
      <mkdir dir="${javadoc.dir}" />
   </target>

   <target name="-copy-respective-services-config-files"
           depends="-clean-generated-blazeds-config-files">
      <copy file="${templates.dir}/${services.config.template}"
            tofile="${app.flex.dir}/${services.config.server.name}" >
         <filterchain>
            <replacetokens>
               <token key="host" value="{server.name}"/>
               <token key="port" value="{server.port}"/>
            </replacetokens>
         </filterchain>
      </copy>
      <copy file="${templates.dir}/${services.config.template}"
            tofile="${app.flex.dir}/${services.config.client.name}" >
         <filterchain>
            <replacetokens>
               <token key="host" value="${client.host}"/>
               <token key="port" value="${client.port}"/>
            </replacetokens>
         </filterchain>
      </copy>
   </target>

   <target name="compile"
           depends="compileJavaBasedServer, compileFlexBasedClients"
           description="Compile Java and Flex code." />

   <target name="compileJavaBasedServer"
           description="Compile Java source code used for server side.">
      <javac srcdir="${src.dir}"
             destdir="${classes.dir}"
             classpathref="classpath" />
   </target>

   <target name="compileFlexBasedClients"
           description="Compile the Flex clients"
           depends="compileFlexBasedHelloWorldClient,
                    compileFlexBasedComplexObjectClient" />

   <target name="compileFlexBasedHelloWorldClient"
           description="Compile Flex Hello World client application into SWF file.">
      <exec executable="mxmlc">
         <arg line="-debug=${flex.debug}" />
         <arg line="-context-root=${flex.context.root}" />
         <arg line="-services=${flex.services}" />
         <arg line="-warnings=${flex.warnings}" />
         <arg line="-publisher=${flex.publisher}" />
         <arg line="-title=${flex.title}" />
         <arg line="-description=${flex.description}" />
         <arg line="-verbose-stacktraces=${flex.verbose.stacktraces}" />
         <arg line="-show-actionscript-warnings=${flex.actionscript.warnings}" />
         <arg line="-output ${dist.dir}/${flex.app.helloworld.name.swf}" />
         <arg line="-- ${flex.app.helloworld.name.source}" />
      </exec>
   </target>

   <target name="compileFlexBasedComplexObjectClient"
           description="Compile Flex Complex Object client application into SWF file.">
      <exec executable="mxmlc">
         <arg line="-debug=${flex.debug}" />
         <arg line="-context-root=${flex.context.root}" />
         <arg line="-services=${flex.services}" />
         <arg line="-warnings=${flex.warnings}" />
         <arg line="-publisher=${flex.publisher}" />
         <arg line="-title=${flex.title}" />
         <arg line="-description=${flex.description}" />
         <arg line="-verbose-stacktraces=${flex.verbose.stacktraces}" />
         <arg line="-show-actionscript-warnings=${flex.actionscript.warnings}" />
         <arg line="-output ${dist.dir}/${flex.app.complexobject.name.swf}" />
         <arg line="-- ${flex.app.complexobject.name.source}" />
      </exec>
   </target>

   <target name="war"
           description="Build server's web application archive (WAR)."
           depends="-init,
                    -copy-respective-services-config-files,
                    compileJavaBasedServer">
      <war webxml="${web.inf.dir}/web.xml"
           destfile="${dist.dir}/${serverside.war}"
           filesonly="true">
         <zipfileset dir="${web.inf.dir}"
                     excludes="web.xml
                               flex/${services.config.client.name}"
                     prefix="WEB-INF" />
      </war>
   </target>

   <target name="all" depends="war, compileFlexBasedClients"
           description="Build it all; the default target." />

   <target name="clean" description="Remove generated files."
           depends="-clean-generated-blazeds-config-files">
      <delete dir="${dist.dir}" />
      <delete dir="${classes.dir}/dustin" />
   </target>

   <target name="-clean-generated-blazeds-config-files">
      <delete file="${app.flex.dir}/${services.config.server.name}"
              quiet="true" />
      <delete file="${app.flex.dir}/${services.config.client.name}"
              quiet="true"/>
   </target>

   <target name="javadoc" description="Generate Javadoc-based documentation">
      <javadoc doctitle="Dustin's Spring BlazeDS Integration Example"
               destdir="${javadoc.dir}"
               sourcepath="${src.dir}"
               classpathref="classpath"
               private="true"
               author="Dustin" />
   </target>

</project>
In the above
build.xml file, there are three properties defined near the top that would most likely need to be changed for a different deployment environment. They are client.host, client.port, and app.dir. The first two are used to appropriately build the client's version of services-config.xml to reference the host and port on which the server BlazeDS-powered application will be running. Because I am using GlassFish defaults for my server, I define these properties respectively to localhost and 8080. The third property, app.dir defines the directory into which I expanded the contents of the blazeds.war file for editing.Targets of specific interest in the above
build.xml file include the compileFlexBasedHelloWorldClient target for building the Flex client with the mxmlc compiler and the war target for building the WAR file to be deployed on the server.When I build the WAR and the client SWF file (same name as its source MXML file but with an .swf extension rather than the .mxml extension), I can then deploy the WAR and run the SWF client. The deployment of the WAR file is done with whatever mechanism your web serve provides. The SWF client can easily be executed by clicking on it or typing its full name on the command line. The following two screen snapshots show the client running by first showing how it initially appears and then showing how it appears once a name has been entered into the name field.


Binding Java to ActionScript
The above example demonstrates the ability to remotely call Java on the server from MXML on the client via the RemoteObject and BlazeDS. However, the example up to this point has only used simple mappings (in this case Strings). It is more interesting to now move onto an example of binding a more complex objects. The good news is that it is all still pretty easy.
For this slightly more complex example, we will expand the
HelloWorldRemotingServer class to feature a method that accepts a domain object that is neither a primitive, a boxed version of a primitive, or a String. The revised version of HelloWorldRemotingServer is shown next:HelloWorldRemotingServer.java (Finished Version)
package dustin;

/**
 * Simple "Hello World" example meant for use in BlazeDS remoting example.
 * This is the server-side POJO that will be exposed to a Flex client via
 * BlazeDS remoting.
 *
 * @author Dustin
 */
public class HelloWorldRemotingServer
{
   /** No-arguments constructor. */
   public HelloWorldRemotingServer() {}

   /**
    * Accept a String representing a name and return that name as part of a
    * Hello message.
    *
    * @param nameToSayHelloTo Name to which Hello will be addressed.
    * @return Hello address to provided name.
    */
   public String processHello(final String nameToSayHelloTo)
   {
      return "Hello, " + nameToSayHelloTo + "!";
   }

   /**
    * Accept a last name and a first name and return the concatendated name as
    * part of a James Bond like introduction.
    *
    * @param firstName Provided first name of person.
    * @param lastName Provided last name of person.
    * @return The James Bond like introductory message.
    */
   public String processName(final String firstName, final String lastName)
   {
      return "Your name is " + lastName + ". " + firstName + " " + lastName + ".";
   }

   /**
    * Accept a Person and return that person's name as part of a James Bond like
    * introduction.
    *
    * @param person Person whose name will be returned.
    * @return The James Bond like introductory message.
    */
   public String processName(final Person person)
   {
      return  "Your name is " + person.getLastName() + ". "
             + person.getFirstName() + " " + person.getLastName() + "!";
   }
}
One of the newly added methods is called
processName(String,String). This wouldn't make a very exciting example because it still uses two separate Strings. The more interesting example will be binding a Flex client to the processName(Person) method that expects a Person instance. For our newly updated class to compile, we need to define a Person class in the same package. That is shown next:Person.java
package dustin;

/**
 * Encapsulates a person's information.
 *
 * @author Dustin
 */
public class Person
{
   /** Last name of person. */
   private String lastName;

   /** First name of person. */
   private String firstName;

   /** No-arguments constructor. */
   public Person() {}

   /**
    * Constructor accepting names for this person.
    *
    * @param newLastName Last name of the person.
    * @param newFirstName First name of the person.
    */
   public Person(final String newLastName,
                 final String newFirstName,
                 final int newAge)
   {
      this.lastName = newLastName;
      this.firstName = newFirstName;
   }

   /**
    * Provide person's first name.
    *
    * @return Person's first name.
    */
   public String getFirstName()
   {
      return this.firstName;
   }

   /**
    * Set/change the person's first name.
    *
    * @param newFirstName New first name for the person.
    */
   public void setFirstName(final String newFirstName)
   {
      this.firstName = newFirstName;
   }

   /**
    * Provide person's last name.
    *
    * @return Person's last name.
    */
   public String getLastName()
   {
      return this.lastName;
   }

   /**
    * Set/change person's last name.
    *
    * @param newLastName New last name for person.
    */
   public void setLastName(final String newLastName)
   {
      this.lastName = newLastName;
   }

   /**
    * String representation of me.
    *
    * @return My String representation.
    */
   @Override
   public String toString()
   {
      return this.firstName + " " + this.lastName;
   }
}
There is nothing remarkable about the
Person class and there is no sign of any association with ActionScript or Flex in this Java class. In fact, the Person class is downright boring.For Strings, primitives, and object/boxed versions of primitives, BlazeDS can typically map these types to appropriate ActionScript types. Now that we've introduced the
Person type, however, we need to instruct BlazeDS how to use this Java class on the Flex-based client side. This is easily done by simply creating a parallel Person class in ActionScript that explicitly associates itself with the Java version of Person. The code for the ActionScript version of Person is shown next.Person.as
package dustin
{
   [Bindable]
   [RemoteClass(alias="dustin.Person")]
   public class Person
   {
      /** First name of person. */
      private var _firstName:String;

      /** Last name of person. */
      private var _lastName:String;

      /**
       * Constructor accepting names of this newly instantiated person.
       * Because each parameter has a default of null, this can be used as a
       * no-arguments constructor.
       *
       * @param newFirstName First name to be used for this person.
       * @param newLastName Last name to be used for this person.
       */
      public function Person(
         newFirstName:String = null,
         newLastName:String = null)
      {
         _firstName = newFirstName;
         _lastName = newLastName;
      }

      /**
       * WRITE (set/change) firstName property.
       *
       * @param newFirstName New first name.
       */
      public function set firstName(newFirstName:String):void
      {
         _firstName = newFirstName;
      }

      /**
       * READ firstName property.
       *
       * @return My first name.
       */
      public function get firstName():String
      {
         return _firstName;
      }

      /**
       * WRITE (set/change) lastName property.
       *
       * @param newLastName new last name.
       */
      public function set lastName(newLastName:String):void
      {
         _lastName = newLastName;
      }

      /**
       * READ lastName property.
       *
       * @return My last name.
       */
      public function get lastName():String
      {
         return _lastName;
      }
   }
}
Arguably the most interesting point about the ActionScript version of
Person is the use of RemoteClass metadata tag ([RemoteClass(alias="dustin.Person")]) to explicitly associate this ActionScript class with the Java class. By naming the property write/set and read/get methods to match those in the Java class, the remaining binding of ActionScript object to Java object is handled by BlazeDS.The ActionScript
Person.as file should be placed in a newly created subdirectory named dustin (for the "dustin" package) parallel to the WEB-INF directory. We now need to move onto building a new Flex client to use this new method on the server-side.I want to make one final observation regarding the
Person class in ActionScript. The code would have been even more concise if I had made the data members public. In that case, they could be accessed directly and the set and get methods would not be necessary. Many of the online examples take this approach.A New Flex Client (Complex Object Client)
The code for
ComplexObjectRemotingClient.mxml is shown next. It should be placed in the same location as our previous Flex client (in expanded directory and parallel to the WEB-INF subdirectory).ComplexObjectRemotingClient.mxml
<?xml version="1.0" encoding="UTF-8" ?>
<mx:Application xmlns:mx="http://www.adobe.com/2006/mxml"
                width="1100" height="700">

   <mx:Script>
   import dustin.Person;

   /**
    * Prepare provided name information and send to server.
    *
    * @param firstName First name of person.
    * @param lastName Last name of person.
    */
   public function processAndSubmitName(firstName:String, lastName:String):void
   {
      const person:Person = new Person(firstName, lastName);
      remoteObject.processName(person);
   }
   </mx:Script>

   <!-- Associate client with BlazeDS destination via RemoteObject. -->
   <mx:RemoteObject id="remoteObject" destination="HelloWorld" />

   <mx:Panel id="mainPanel" title="BlazeDS Remoting Example - Complex Object Mapping">
      <mx:Form>
         <mx:FormItem label="Your First Name">
            <mx:TextInput id="firstNameInput" />
         </mx:FormItem>
         <mx:FormItem label="Your Last Name">
            <mx:TextInput id="lastNameInput" />
         </mx:FormItem>
         <mx:FormItem>
            <mx:Button label="Submit Name!"
                       click="processAndSubmitName(firstNameInput.text, lastNameInput.text);" />
         </mx:FormItem>
         <mx:FormItem label="Server's Response">
            <mx:Label text="{remoteObject.processName.lastResult}" />
         </mx:FormItem>
      </mx:Form>
   </mx:Panel>
</mx:Application>
The new Flex client uses a little ActionScript to prepare the call to the server and instantiates one of our newly written
Person objects in the process. The build.xml file shown previously already included the target for building this new client ("compileFlexBasedComplexObjectClient"). Note that the Java code also needs to be rebuilt and the WAR reassembled and redeployed to the web server because of the addition of methods to the server class.The following two screen snapshots show the initial and final state of the new client when it is executed as the Hello World client was earlier.


As the above output shows, the method accepting a Person object (note the exclamation point in the returned message) has been contacted on the Java side from a remote Flex client.
Pictorial Overview of Directory/File Structure
One of the things that can be a little tricky about using BlazeDS or the mxmlc compiler if you have very little experience using them is the placement of files. Fortunately, most of this was already setup correctly by the
blazeds.war file that we expanded. However, I did add some directories and files. In an effort to make it more clear where these directories and files are in relation to one another, I include the next screen snapshot of my final directory structure. I tried in the text above to describe where within these various directories each file should go.
The image above shows where to place MXML source files, ActionScript source files, and Java source files for the
build.xml file described above to work properly. I did not provide descriptions of the nbproject subdirectory (used for NetBeans specifically), the images subdirectory (used to store the screen snapshots shown in this blog posting), or the WEB-INF subdirectory (it was provided by the expanding of blazeds.war). The only thing to note here is that I added the Java source code files (but not ActionScript source code files) into the src directory under WEB-INF.Conclusion
This has turned out to be a rather lengthy blog entry. However, this is to be expected considering that I've intentionally tried to make this a complete and thorough introduction to BlazeDS/Java remoting and because I have included the code directly within the blog posting rather than as a separate attachment. Also, I've tried to avoid use of anything specific to FlexBuilder so that anyone with any text editor should be able to use my examples.
Despite the length of this blog entry, use of the BlazeDS remoting is pretty straightforward once you have tried it a couple times. It does get more complex when security constraints and other details are added back in, but one can choose how much one implements at each step and the examples above are nice for confirming that client-to-server communication is working properly.
Additional Resources
Subscribe to:
Posts (Atom)