Perhaps the easiest way to start working with BlazeDS is to have the BlazeDS Developer Guide handy for reference and to modify the sample files included with the BlazeDS download to one's own application. In this blog entry, I'll show BlazeDS configuration files that were modified from files available in the samples. I have removed much of the extraneous details that are not relevant to HTTPService to make the files clearer to understand.
The following steps are required to build a first BlazeDS-powered example.
1. Download Flex 3 (or Flex 2 will work).
2. Unzip/expand the downloaded Flex file to a directory. For example, I have Flex 3 installed at C:\flex_sdk_3 for this example.
3. Download BlazeDS (it is still separate even from Flex 3). There are multiple versions of BlazeDS (nightly build or release builds, turnkey or binary or source, etc.). For my example here, I'm using the binary download. I didn't need Tomcat (which comes with the Turnkey version) because I already had it installed. However, I downloaded the Turnkey edition because it has the same blazeds.war file needed for my example (or for any BlazeDS-powered application). In addition, it has a ds-console.war and the sample files to learn from and adapt. The
ds-console.war file is useful because it provides Flash-based view into the BlazeDS server once we have it up and running.4. Unzip/expand the downloaded BlazeDS file into a directory. I expanded the download file into a temporary directory and then expanded the
blazeds.war into a directory of its own called C:\blazeds-expanded. I expanded this so that I could have my own web application (WAR file) be built with the necessary pieces of this included. For example, the expanded contents include important JAR files in the C:\blazeds-expanded\WEB-INF\lib directory (which we will bundle into our WAR's WEB-INF/lib) and the BlazeDS XML-based configuration files in the C:\blazeds-expanded\WEB-INF\flex directory that we will edit for this example and place in our generated WAR's WEB-INF/flex directory.5. Download Tomcat. I chose to use a separate Tomcat rather than the one included with BlazeDS turnkey.
6. Unzip/expand the Tomcat download. Instructions for installing/setting up Tomcat are available here. I installed Tomcat at C:\apache-tomcat-6.0.16.
7. Build the server-side servlet for supporting HTTPService. In most realistic cases, this is likely an already existing servlet. The code for this example's very basic servlet is shown next.
package dustin;

import java.io.*;

import javax.servlet.*;
import javax.servlet.http.*;

/**
 * Simple example intended to demonstrate BlazeDS with HttpService.
 */
public class BlazeHttpExample extends HttpServlet
{
   /**
    * Processes requests for both HTTP <code>GET</code> and <code>POST</code> methods.
    * @param request servlet request
    * @param response servlet response
    */
   protected void processRequest(
      HttpServletRequest request, HttpServletResponse response)
      throws ServletException, IOException
   {
      final String xmlProlog = "<?xml version=\"1.0\" encoding=\"UTF-8\"?>";
      final String lineSeparator = System.getProperty("line.separator");
      response.setContentType("text/html;charset=UTF-8");
      final PrintWriter out = response.getWriter();
      try
      {
         final String user = request.getParameter("user");
         out.print(  xmlProlog + lineSeparator
                   + "<Messages><Message>Hello, " + user
                   + "!</Message></Messages>");
      }
      finally
      {
         out.close();
      }
   }

   /**
    * Handles the HTTP <code>GET</code> method.
    * @param request servlet request
    * @param response servlet response
    */
   @Override
   protected void doGet(HttpServletRequest request, HttpServletResponse response)
      throws ServletException, IOException
   {
      processRequest(request, response);
   }

   /**
    * Handles the HTTP <code>POST</code> method.
    * @param request servlet request
    * @param response servlet response
    */
   @Override
   protected void doPost(HttpServletRequest request, HttpServletResponse response)
      throws ServletException, IOException
   {
      processRequest(request, response);
   }

   /**
    * Returns a short description of the servlet.
    */
   @Override
   public String getServletInfo()
   {
      return "Simple intended to illustrate BlazeDS HttpService support.";
   }
}
The highlighted section of code above shows the most important piece of the servlet. This simple servlet accepts a URL parameter "user" and places that in a Hello World-inspired String to return to the client.
8. Generate or edit an appropriate web.xml file. You can copy the
web.xml file from the downloaded and expanded blazeds.war file and edit that. However, it comes with a Servlet 2.2-compliant web.xml file and I prefer a Servlet 2.5-compliant web.xml file (see this blog entry for the reason). So I prefer to paste the relevant portions from the BlazeDS-provided web.xml file into my own web.xml file that is servlet 2.5 based. This is often the case anyway because you often have your web application already. The next code listing shows the web.xml file for this example.
<?xml version="1.0" encoding="UTF-8"?>
<web-app version="2.5"
         xmlns="http://java.sun.com/xml/ns/javaee"
         xmlns:xsi="http://www.w3.org/2001/XMLSchema-instance"
         xsi:schemaLocation="http://java.sun.com/xml/ns/javaee
                             http://java.sun.com/xml/ns/javaee/web-app_2_5.xsd">
   <display-name>Dustin's BlazeDS Example</display-name>
   <description>Example Using BlazeDS</description>

   <context-param>
      <param-name>flex.class.path</param-name>
      <param-value>/WEB-INF/flex/hotfixes</param-value>
   </context-param>

   <!-- Http Flex Session attribute and binding listener support -->
   <listener>
      <listener-class>flex.messaging.HttpFlexSession</listener-class>
   </listener>

   <!-- MessageBroker Servlet -->
   <servlet>
      <servlet-name>MessageBrokerServlet</servlet-name>
      <servlet-class>flex.messaging.MessageBrokerServlet</servlet-class>
      <init-param>
         <param-name>services.configuration.file</param-name>
         <param-value>/WEB-INF/flex/services-config.xml</param-value>
      </init-param>
      <load-on-startup>1</load-on-startup>
   </servlet>

   <servlet>
      <servlet-name>BlazeDSExampleServlet</servlet-name>
      <servlet-class>dustin.BlazeHttpExample</servlet-class>
   </servlet>

   <servlet-mapping>
      <servlet-name>BlazeDSExampleServlet</servlet-name>
      <url-pattern>/blazeDS</url-pattern>
   </servlet-mapping>

   <!-- MessageBrokerServlet -->
   <servlet-mapping>
      <servlet-name>MessageBrokerServlet</servlet-name>
      <url-pattern>/messagebroker/*</url-pattern>
   </servlet-mapping>

   <welcome-file-list>
      <welcome-file>index.htm</welcome-file>
   </welcome-file-list>

   <login-config>
      <auth-method>BASIC</auth-method>
   </login-config>

</web-app>
9. Adapt the services-config.xml file and the proxy-config.xml files from the BlazeDS sample to work for this example. The next code listing shows the contents of the
services-config.xml after it has been adapted and simplified for this example.
<?xml version="1.0" encoding="UTF-8"?>
<services-config>

  <services>
    <service-include file-path="proxy-config.xml" />
    <default-channels>
      <channel ref="my-amf"/>
    </default-channels>
  </services>

  <channels>
    <channel-definition id="my-amf" class="mx.messaging.channels.AMFChannel">
      <endpoint url="http://{server.name}:{server.port}/{context.root}/messagebroker/amf"
                class="flex.messaging.endpoints.AMFEndpoint"/>
      <properties>
        <polling-enabled>false</polling-enabled>
      </properties>
    </channel-definition>
    <channel-definition id="my-http" class="mx.messaging.channels.HTTPChannel">
      <endpoint url="http://{server.name}:{server.port}/{context.root}/messagebroker/http"
                class="flex.messaging.endpoints.HTTPEndpoint"/>
    </channel-definition>
  </channels>

  <logging>
    <!-- You may also use flex.messaging.log.ServletLogTarget -->
    <target class="flex.messaging.log.ConsoleTarget" level="Error">
      <properties>
        <prefix>[BlazeDS] </prefix>
        <includeDate>false</includeDate>
        <includeTime>false</includeTime>
        <includeLevel>true</includeLevel>
        <includeCategory>false</includeCategory>
      </properties>
      <filters>
        <pattern>Endpoint.*</pattern>
        <pattern>Service.*</pattern>
        <pattern>Configuration</pattern>
      </filters>
    </target>
  </logging>

  <system>
    <redeploy>
      <enabled>true</enabled>
      <watch-interval>20</watch-interval>
      <watch-file>{context.root}/WEB-INF/flex/services-config.xml</watch-file>
      <watch-file>{context.root}/WEB-INF/flex/proxy-config.xml</watch-file>
      <watch-file>{context.root}/WEB-INF/flex/remoting-config.xml</watch-file>
      <watch-file>{context.root}/WEB-INF/flex/messaging-config.xml</watch-file>
      <touch-file>{context.root}/WEB-INF/web.xml</touch-file>
    </redeploy>
  </system>

</services-config>
The
services-config.xml file showed above is necessary for any BlazeDS-based server support. As shown in the listing above, the services-config.xml file points to another file, proxy-config.xml for HTTPService-specific configuration details. It could have been a section directly within the services-config.xml, but BlazeDS externalized the specific details and that feels more modular and easier to manage to me as well. Note that BlazeDS Developer Guide points out that HTTPService and WebService are configured as proxy services (often configured as in this example in an a proxy-config.xml file) while BlazeDS Remote Objects are configured in remoting services (often in an external file remoting-config.xml) and BlazeDS Messaging is configured as messaging services (often in an external file messaging-config.xml). Because the example covered here only uses HTTPService, only the proxy-config.xml file is needed in addition to the services-config.xml file.The next code listing shows the contents of the simplified
proxy-config.xml file.
<?xml version="1.0" encoding="UTF-8"?>
<service id="proxy-service" class="flex.messaging.services.HTTPProxyService">

  <properties>
    <connection-manager>
      <max-total-connections>100</max-total-connections>
      <default-max-connections-per-host>2</default-max-connections-per-host>
    </connection-manager>

        <allow-lax-ssl>true</allow-lax-ssl>
  </properties>

  <default-channels>
    <channel ref="my-http"/>
    <channel ref="my-amf"/>
  </default-channels>

  <adapters>
    <adapter-definition id="http-proxy"
                        class="flex.messaging.services.http.HTTPProxyAdapter"
                        default="true"/>
  </adapters>

  <destination id="BlazeDSHTTP">
    <properties>
      <url>/{context.root}/blazeDS</url>
    </properties>
  </destination>

</service>
10. Create the Flex client that will "talk" to the BlazeDS server. A simple Flex client is shown next. It enables communication with the servlet described above both via the standard HTTPService that does not use BlazeDS and via the BlazeDS-based HTTPService that has been the central part of this blog entry.
<mx:Application xmlns:mx="http://www.adobe.com/2006/mxml"
                width="750" height="500">

  <mx:Script>
  <![CDATA[
  import mx.controls.Alert;
  import mx.events.ItemClickEvent;
  import mx.rpc.events.FaultEvent;
  import mx.rpc.events.ResultEvent;

  private const radioButtonFieldSize:int = 250;
  private const resultsTextAreaHeight:int = 150;
  private const resultsTextAreaWidth:int = 300;
  private const userServiceNoBlazeDsUrl:String =
    "http://localhost:8080/dustin-blazeds/blazeDS";

  protected function invokeHttpService(event:ItemClickEvent):void
  {
    const selectedService:String = event.currentTarget.selectedValue;
    if ( selectedService == "httpNoBlazeDS")
    {
      userServiceHttpSansBlazeDS.send();
    }
    else if ( selectedService == "httpYesBlazeDS" )
    {
      userServiceHttpWithBlazeDS.send({user: 'Someone Else'});
    }
    else
    {
      Alert.show("An unknown Service was requested");
    }
  }

  protected function resultHandlerSansBlazeDS(event:ResultEvent):void
  {
    serviceResultsTextArea.text =
         "Success withOUT BlazeDS!\n"
       + userServiceHttpSansBlazeDS.lastResult.Message;
  }

  protected function resultHandlerWithBlazeDS(event:ResultEvent):void
  {
    serviceResultsTextArea.text =
        "Success with BlazeDS!\n"
      + userServiceHttpWithBlazeDS.lastResult.Message;
  }

  protected function faultHandler(event:FaultEvent):void
  {
    serviceResultsTextArea.text =
        "Failure trying to access service.\n"
      + event.fault.faultString + "\n" + event.fault.faultDetail;
  }
  ]]>
  </mx:Script>

  <mx:HTTPService id="userServiceHttpSansBlazeDS"
                  useProxy="false"
                  resultFormat="e4x"
                  url="{userServiceNoBlazeDsUrl}?user=Dustin"
                  fault="faultHandler(event)"
                  result="resultHandlerSansBlazeDS(event)" />

  <mx:HTTPService id="userServiceHttpWithBlazeDS"
                  useProxy="true"
                  resultFormat="e4x"
                  destination="BlazeDSHTTP"
                  fault="faultHandler(event)"
                  result="resultHandlerWithBlazeDS(event)" />

  <mx:Panel id="mainPanel" title="Output from HTTP Service Calls">
    <mx:RadioButtonGroup id="serviceCallType"
                         itemClick="invokeHttpService(event);" />
    <mx:RadioButton groupName="serviceCallType"
                    id="httpWithoutBlazeDS"
                    value="httpNoBlazeDS"
                    label="HTTPService without BlazeDS"
                    width="{radioButtonFieldSize}" />
    <mx:RadioButton groupName="serviceCallType"
                    id="httpWithBlazeDS"
                    value="httpYesBlazeDS"
                    label="HTTPService with BlazeDS"
                    width="{radioButtonFieldSize}" />
    <mx:TextArea id="serviceResultsTextArea"
                 width="{resultsTextAreaWidth}"
                 height="{resultsTextAreaHeight}" />
  </mx:Panel>

</mx:Application>
I intentionally created this Flex client to use both standard HTTPService and BlazeDS-based HTTPService to demonstate how alike they are, but also to show the subtle differences. The most significant difference is that one specifies a url attribute for the non-BlazeDS HTTPService while one specifies a destination attribute for the BlazeDS-based HTTPService. This destination corresponds with the defined destination in the configuration XML files previously examined.
11. Build the Flex client (compile the MXML source into a SWF file); build the servlet; and package the client, servlet, and all the configuration files and BlazeDS JAR files into a WAR to be deployed. This is most easily done with a build script. I use Ant for this example and the
build.properties and build.xml files are shown next.build.xml
<?xml version="1.0" encoding="UTF-8"?>

<project name="JavaBlazeDS" default="default" basedir=".">

  <property file="build.properties" />

  <path id="classpath">
    <pathelement location="${lib.servlet}"/>
  </path>

  <target name="initialize">
    <mkdir dir="${dir.build}" />
    <mkdir dir="${dir.classes}" />
  </target>

  <target name="clean"
          description="Clean all generated/compiled files.">
     <delete dir="${dir.build}" />
  </target>

  <target name="default"
          depends="buildWar"
          description="Default target for this build." />

  <target name="compileFlex"
          description="Compile Flex application into SWF file.">
    <exec executable="mxmlc">
      <arg line="-debug=${flex.debug}" />
      <arg line="-context-root=${flex.context.root}" />
      <arg line="-services=${flex.services}" />
      <arg line="-publisher=${flex.publisher}" />
      <arg line="-title=${flex.title}" />
      <arg line="-description=${flex.description}" />
      <arg value="${dir.flex.src}/BlazeDSInterface.mxml" />
      <arg line="-output ${dir.build}/BlazeDSInterface.swf" />
    </exec>
  </target>

  <target name="compileJava" depends="initialize"
          description="Compile server-side Java code.">
    <javac srcdir="${dir.src.java}"
           classpathref="classpath"
           destdir="${dir.classes}"/>
  </target>

  <target name="buildWar"
          depends="compileFlex,compileJava"
          description="Generate WAR file with Flex and server-side Java.">
    <war destfile="${dir.build}/${war.dustin-blazeds-example}"
         webxml="${dir.web-inf}/${file.web.xml}">
      <lib dir="${dir.blazeds.lib}" includes="*.jar" />
      <classes dir="${dir.classes}" includes="**/*.class" />
      <zipfileset dir="${dir.flex.config}" includes="*.xml" prefix="WEB-INF/flex" />
      <fileset dir="${dir.build}" includes="*.swf" />
    </war>
  </target>

</project>
build.properties
dir.build=build
dir.classes=${dir.build}/classes
dir.flex.config=WEB-INF/flex
dir.flex.src=web
dir.src.java=src
dir.web-inf=WEB-INF

file.web.xml=web.xml

dir.blazeds=C:\\blazeds-expanded
dir.blazeds.lib=${dir.blazeds}\\WEB-INF\\lib

dir.j2ee.home=C:\\apache-tomcat-6.0.16\\lib
lib.servlet=${dir.j2ee.home}/servlet-api.jar

flex.context.root=dustin-blazeds
flex.debug=true
flex.description="Example of using HTTPService with BlazeDS"
flex.publisher=Dustin
flex.services=C:\\NetBeansProjects\\JavaBlazeDS\\WEB-INF\\flex\\services-config.xml
flex.title="BlazeDS with HTTPService Example"

war.dustin-blazeds-example=dustin-blazeds.war
One vital observation to make from the Ant script above is the importance of passing two mxmlc compiler options to the mxmlc application compiler when working with BlazeDS. The
-context-root and -services application compiler options are significant and required. These are also documented in the feedback section of the blog entry BlazeDS: Open Sourcing Remoting and Messaging.12. Deploy the WAR that contains the Flex client and the BlazeDS JARs and configuration XML. Run the example by going to the appropriate Tomcat URL.
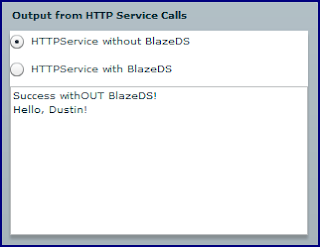
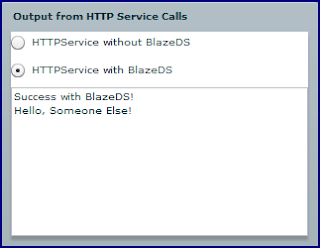
When this last step is followed, the simple Flex client shown above will look something like that shown in the next two screen snapshots.
Results from Using HTTPService without BlazeDS

Results from Using HTTPService with BlazeDS

The simple Flex client shown in these snapshots demonstrates using HTTPService to contact that same servlet both with and without BlazeDS. There are advantages associated with BlazeDS that may justify its significant additional effort. I discussed these in the previously mentioned BlazeDS RPC blog entry. They include the ability to perform authentication, the ability to log on the server-side, and the removal of the requirement to employ a
crossdomain.xml file.In this blog entry, I showed how the BlazeDS-provided samples could be modified to one's own examples to run HTTPService with and without BlazeDS. A developer could then add back in certain portions of the configuration files to add in security, logging, etc.
There are several useful BlazeDS references that provide significantly greater detail than that provided here. I referred to some of them above as well. These resources include the following:
* BlazeDS Developer Guide - Referenced multiple times in this blog entry.
* BlazeDS 30-Minute Test Drive - Useful for seeing BlazeDS in action by using samples directly with turnkey version of BlazeDS. Adds explanation to what the sample code and configuration is actually doing.
* BlazeDS Installation Guide
* BlazeDS for Java-Flex Communication
* BlazeDS: Open Sourcing Remoting and Messaging
* Simplified BlazeDS and JMS
2 comments:
can you please provide the example using flexbuilder 3 instead of flex SDK
Very Useful information provided for beginners
Post a Comment